 ImaraISP
Network provisioning
Configure your switches, sector radios, customer radios and home routers from one screen, and change them safely without visiting the site
In short
- A profile is a saved set of settings for one kind of device, for example "the core switch at Core" or "every customer radio".
- You change the profile once. ImaraISP sends the change to every device that uses it, the next time each device checks in.
- Every change has a safety net: switches roll themselves back if they lose contact, and a sector radio only moves after its customers' radios are ready to follow it.
What this is for
Your MikroTik routers are onboarded with a pasted script (see Add a router). Everything behind them, such as switches, sector access points, the radios on customers' roofs, home Wi-Fi routers and fibre equipment, is managed here.
Use provisioning when you want to:
- give a spare switch port a job, such as a new hotspot,
- move a sector radio to a cleaner frequency without cutting off the homes on it,
- change the Wi-Fi settings on every customer's home router at once,
- see at a glance which VLANs your network uses and which are set aside for later.
| You want to | Go to |
|---|---|
| Connect a new MikroTik router to ImaraISP | Add a router |
| See whether a router is up, and why not | Routers |
| Change settings on switches, radios and CPEs | This page |
Who can use it
| Role | Can see it | Can change it |
|---|---|---|
| Owner | yes | yes |
| Ops | yes | yes |
| Viewer | yes | no |
| Cashier, Support, FieldTech | no | no |
If you can see the screen but have no New profile button, no Edit link on the VLAN plan and no frequency boxes on the radio plan, your role can look but not change. See Permissions.
Words you will see
| On screen | What it means |
|---|---|
| Profile | A named set of settings, for example core-switch. Devices that use the profile get its settings. |
| Role | What kind of device the profile is for: Switch, Sector AP, CPE radio, Home router, Hotspot AP, OLT or ONT. |
| Driver | The make and model family the settings are written for, for example mikrotik-routeros7 or omada-switch. ImaraISP turns the profile into that device's own commands. |
| Devices | How many devices use this profile right now. A profile with 0 devices changes nothing when you edit it. |
| Channels | How ImaraISP reaches those devices, with a count for each. TR-069: the device calls in to ImaraISP by itself on a timer, which is how most customer radios and home routers work. CONTROLLER: changes go through the vendor's own controller, for example an Omada controller. SSH: ImaraISP signs in to the device directly. |
| VLAN | A separate lane of traffic on the same cable. Your network keeps management, PPPoE customers and hotspot users apart this way. |
| Check-in | The moment a device contacts ImaraISP. Changes wait for it; they are not pushed instantly. |
| Rollout | One change being delivered to all the devices it affects, with a live progress page. |
The Provisioning screen
Open Network in the sidebar, then click Provisioning in the page header.
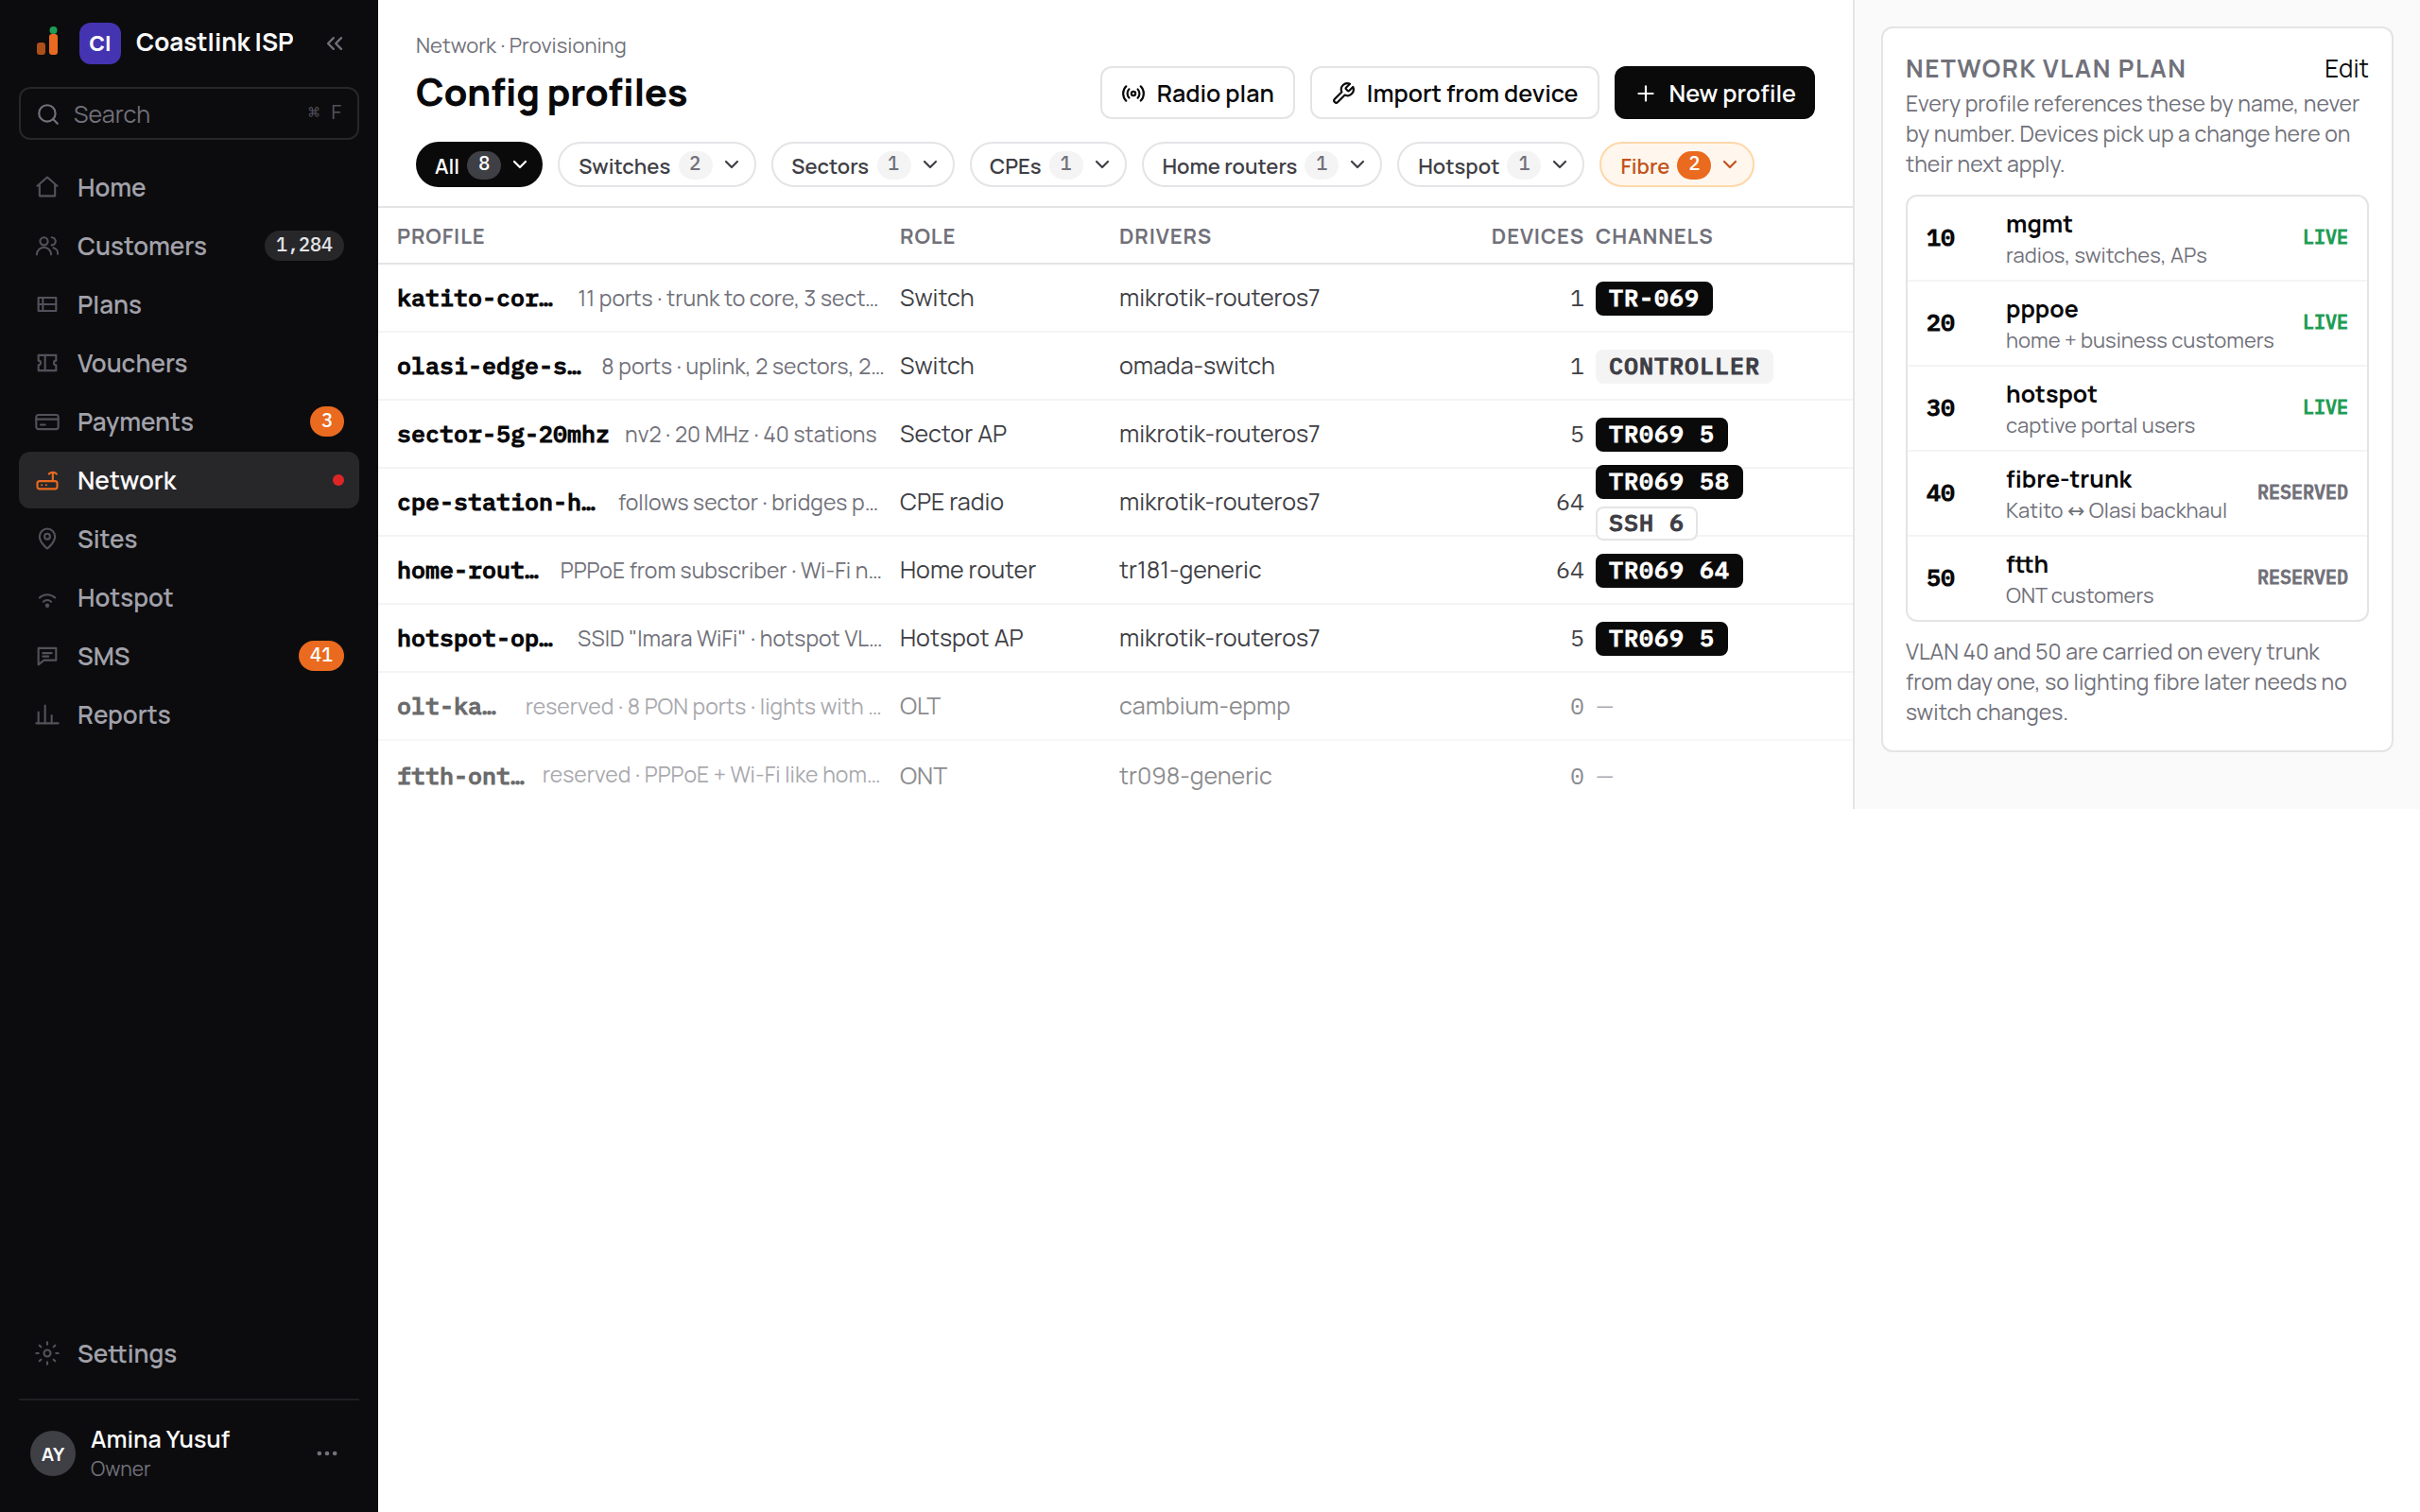
- Config profiles lists every profile: its name and a one-line summary (for example "11 ports · trunk to core, 3 sectors"), its Role, Driver, Devices and Channels.
- The chips across the top filter by kind: All, Switches, Sectors, CPEs, Home routers, Hotspot and Fibre.
- Greyed-out rows are profiles kept ready for equipment you have not installed yet. Their summary starts with "reserved".
- The buttons in the header are Radio plan (frequencies for your sector and customer radios), Import from device and the black New profile.
- The Network VLAN plan on the right is the list of VLANs every profile uses.
Click any profile row to open it.
Which devices use a profile
Devices are linked to a profile when they are set up on your network. This screen has no button to add a device to a profile. The Devices column tells you how many will receive a change before you make it.
Check or change the VLAN plan
Every profile refers to VLANs by name (mgmt, pppoe, hotspot), never by number. The number behind each name lives here, once, for the whole network.
Each VLAN is either:
- LIVE: in use today. Devices carry and use it.
- RESERVED: set aside for later. It is already carried on your trunk links, so when you light it up nothing on the switches has to change. The example network reserves
fibre-trunk(40) andftth(50) for a future fibre rollout.
Click Edit
Edit is in the top right corner of the Network VLAN plan card. Each VLAN gets a LIVE / RESERVED menu.
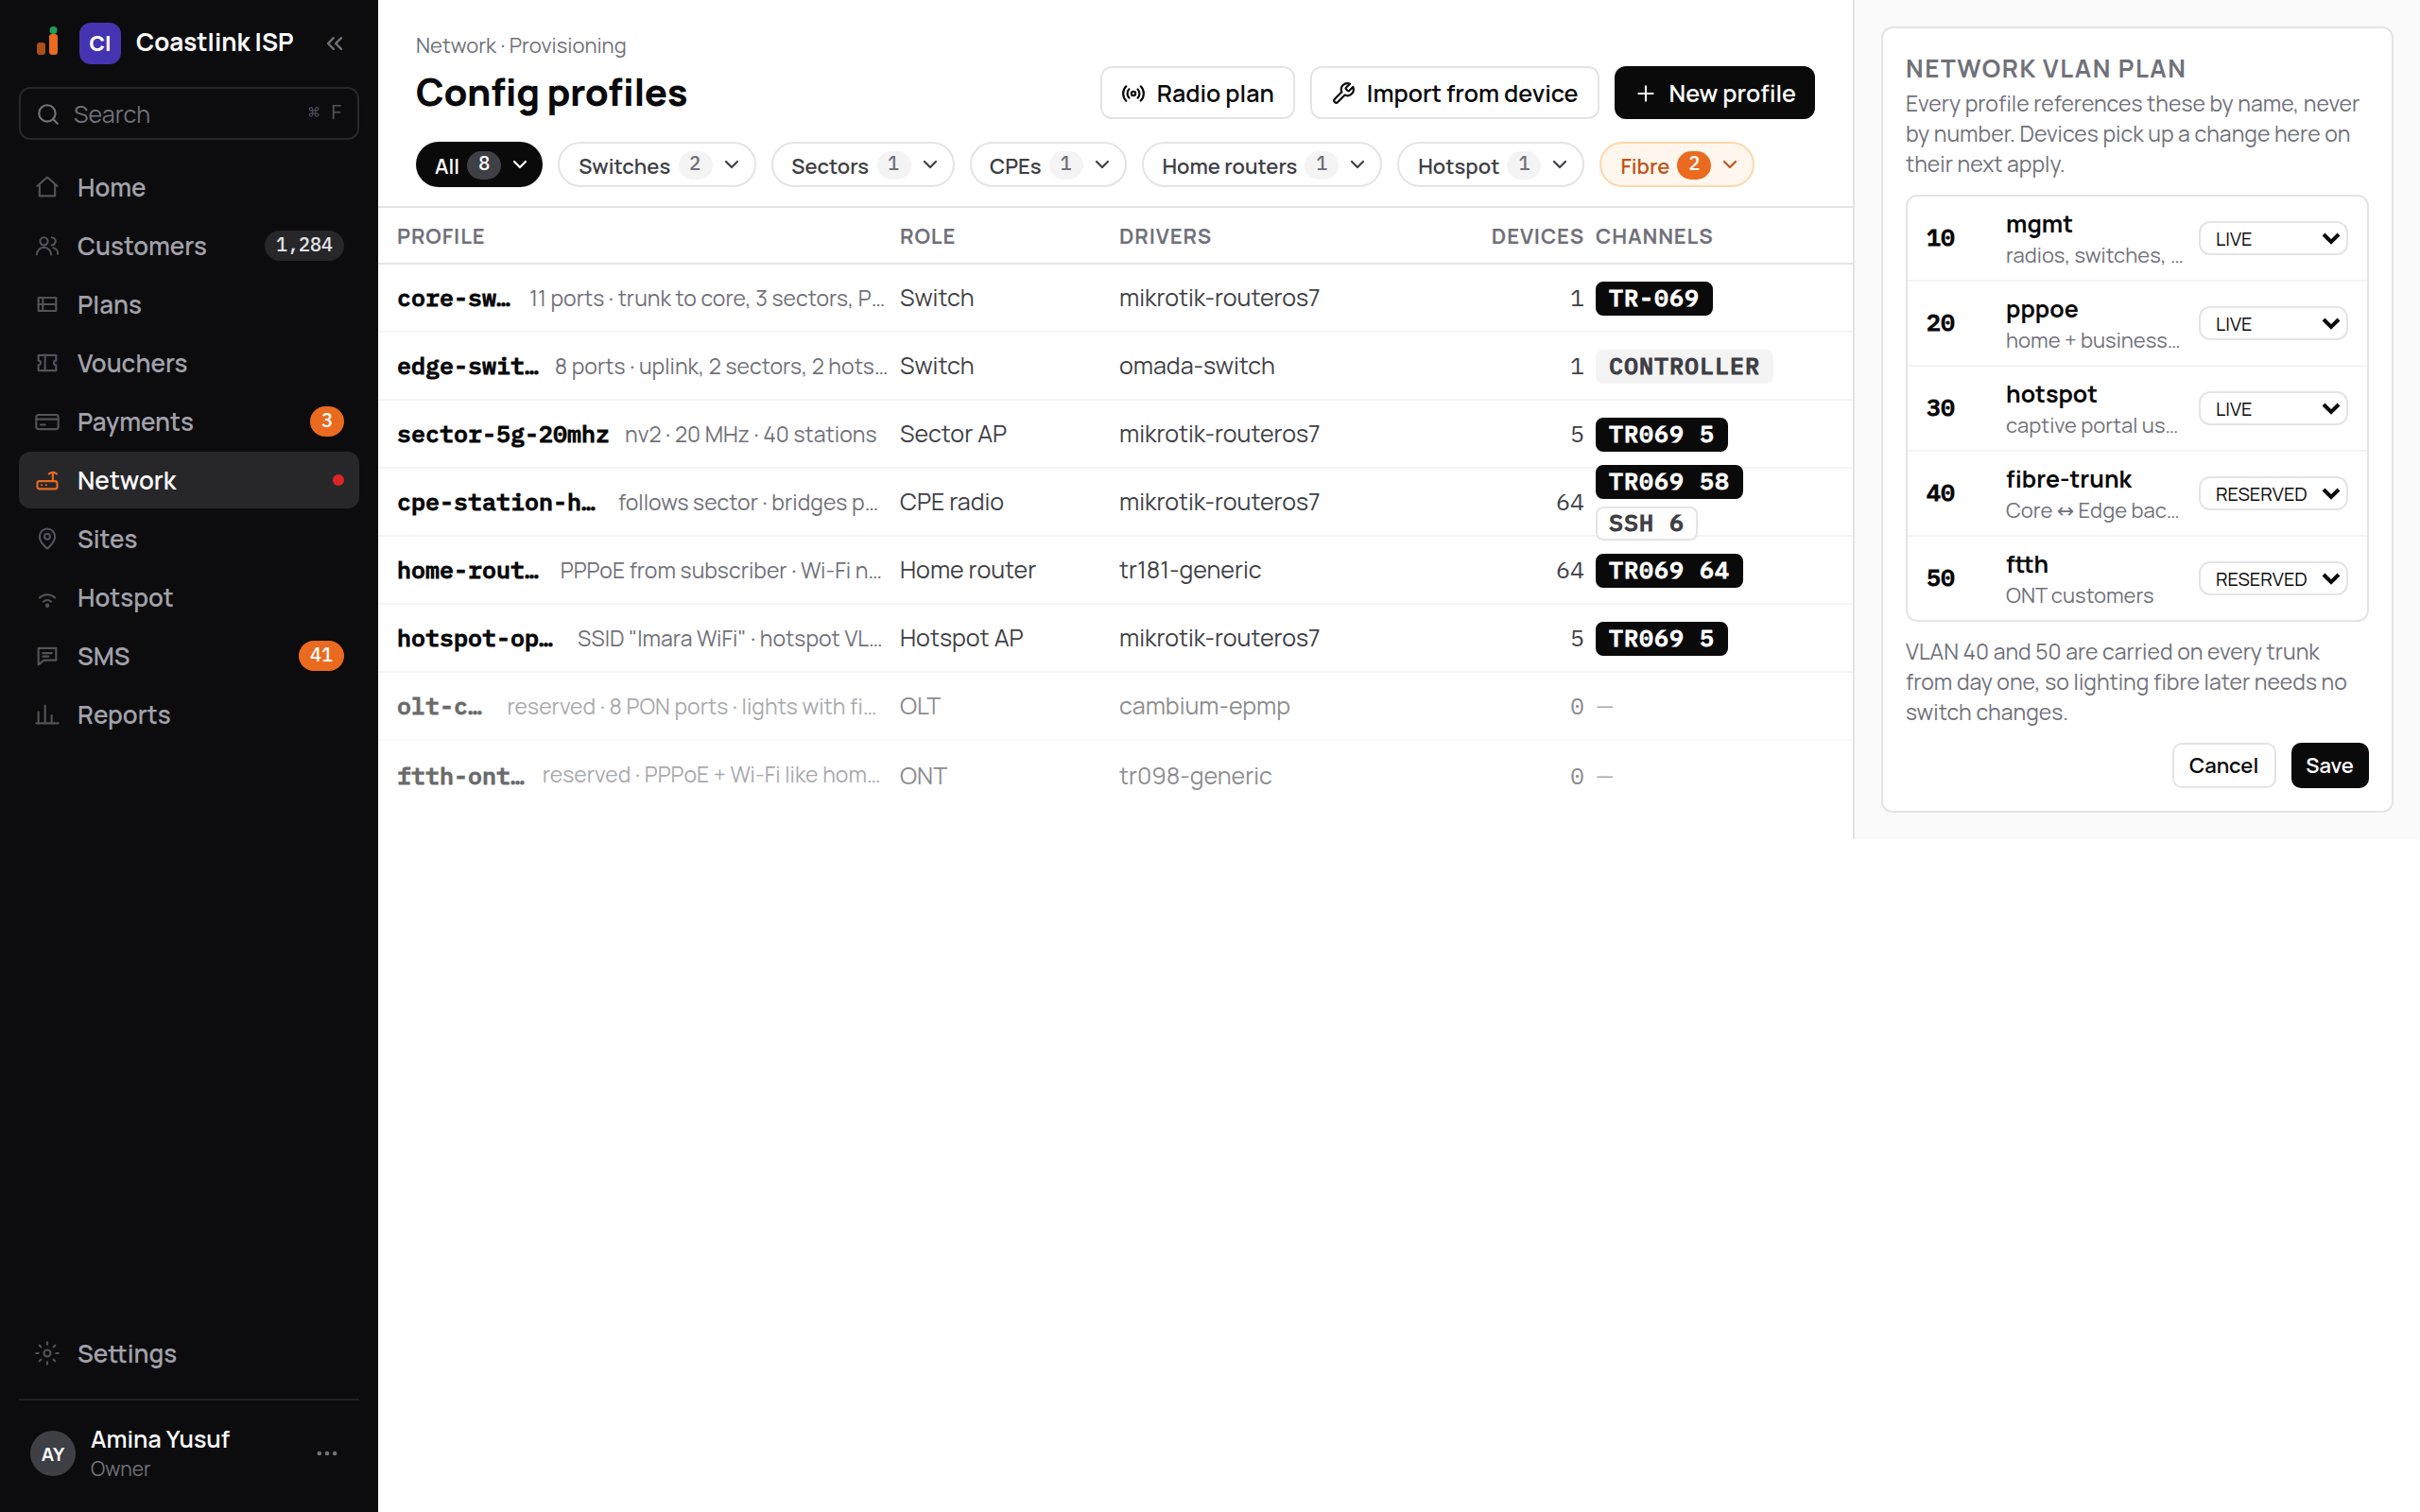
Change the state
Pick LIVE for a VLAN you are starting to use, or RESERVED for one you are setting aside.
Click Save
Cancel throws your edits away. After saving, devices pick up the change the next time a profile is applied to them.
Give a switch port a new job
This walk-through turns the spare port ether9 on the Core switch into the uplink for a new hotspot at the school.
Open the switch profile
Click the switch's row on the Config profiles list, here core-switch.
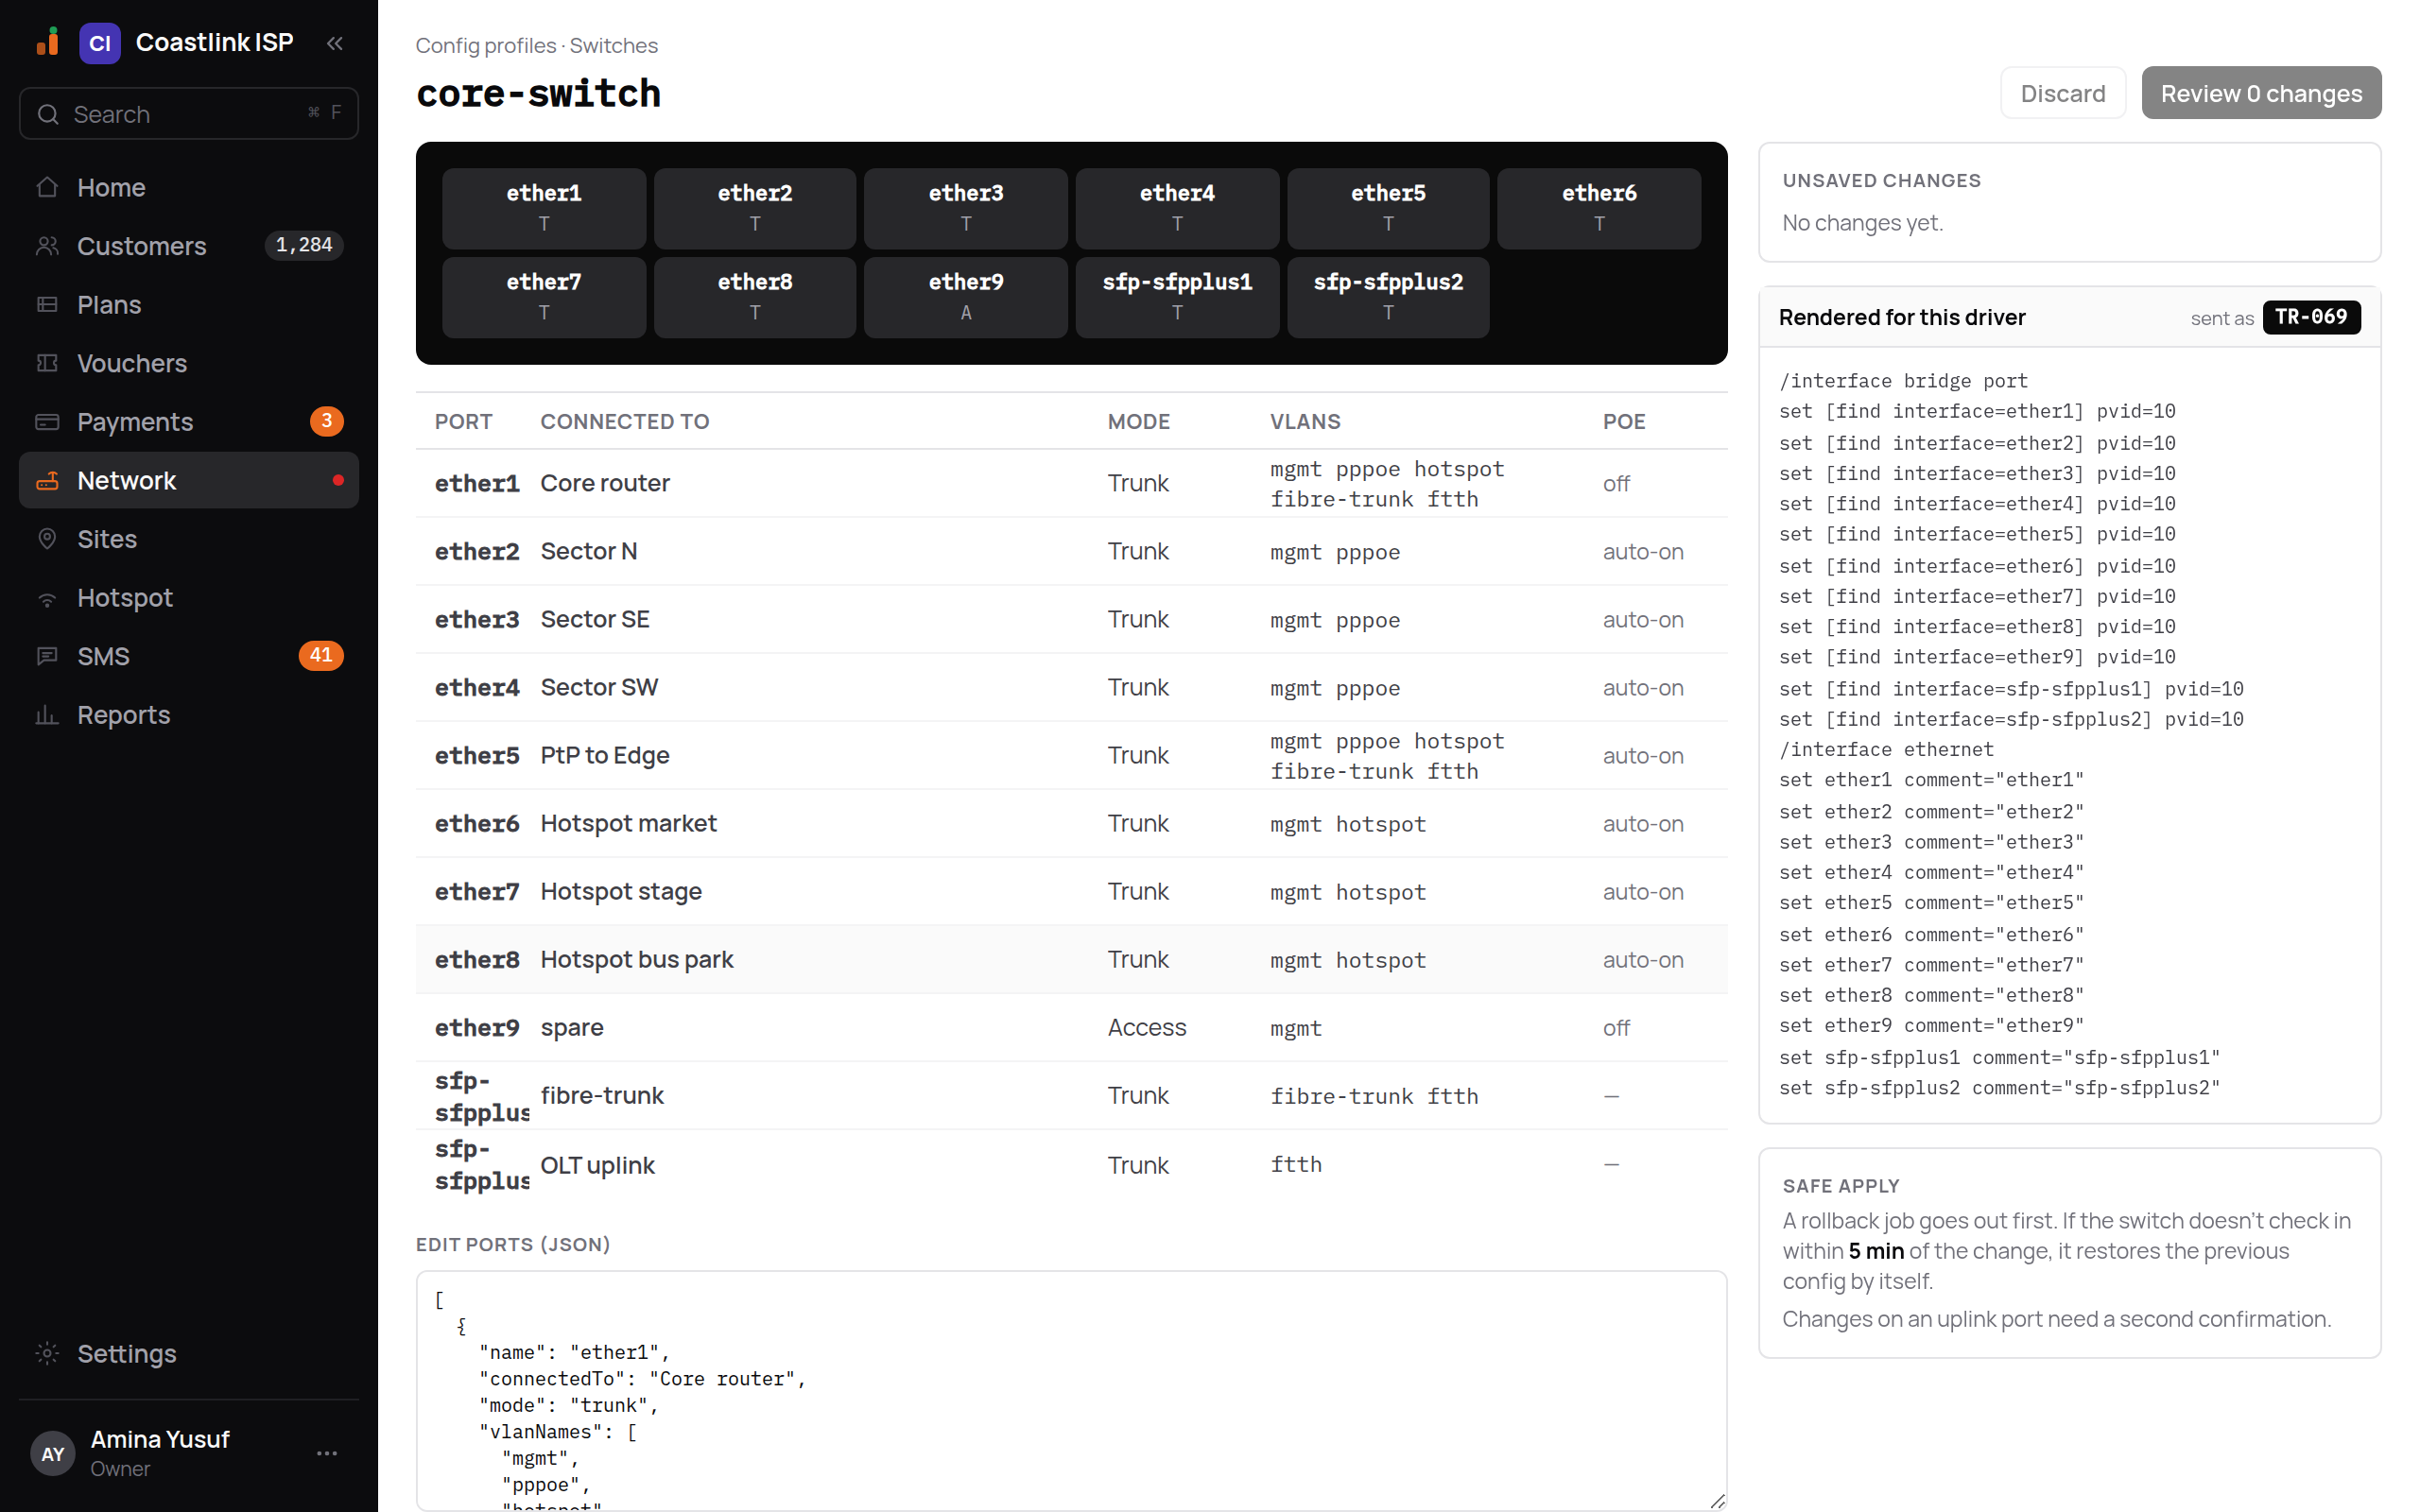
- The dark panel at the top is the switch's front: one box per port, with T for a trunk port (carries several VLANs) and A for an access port (carries one).
- The table lists every port: what it is Connected to, its Mode, its VLANs and PoE (whether it powers the device plugged into it).
- Rendered for this driver on the right shows the exact commands the switch will receive, and the channel they go through. It updates as you type.
- Safe apply explains the safety net (see Safety net below).
Edit the port in the Edit ports box
Scroll to Edit ports (JSON) under the table. It holds one block per port. Find the port you want and change its values. For ether9 that means changing:
{
  "name": "ether9",
  "connectedTo": "Hotspot school",
  "mode": "access",
  "vlanName": "hotspot",
  "poe": "off"
}
The table above updates as you type, and Unsaved changes on the right names the port you changed.
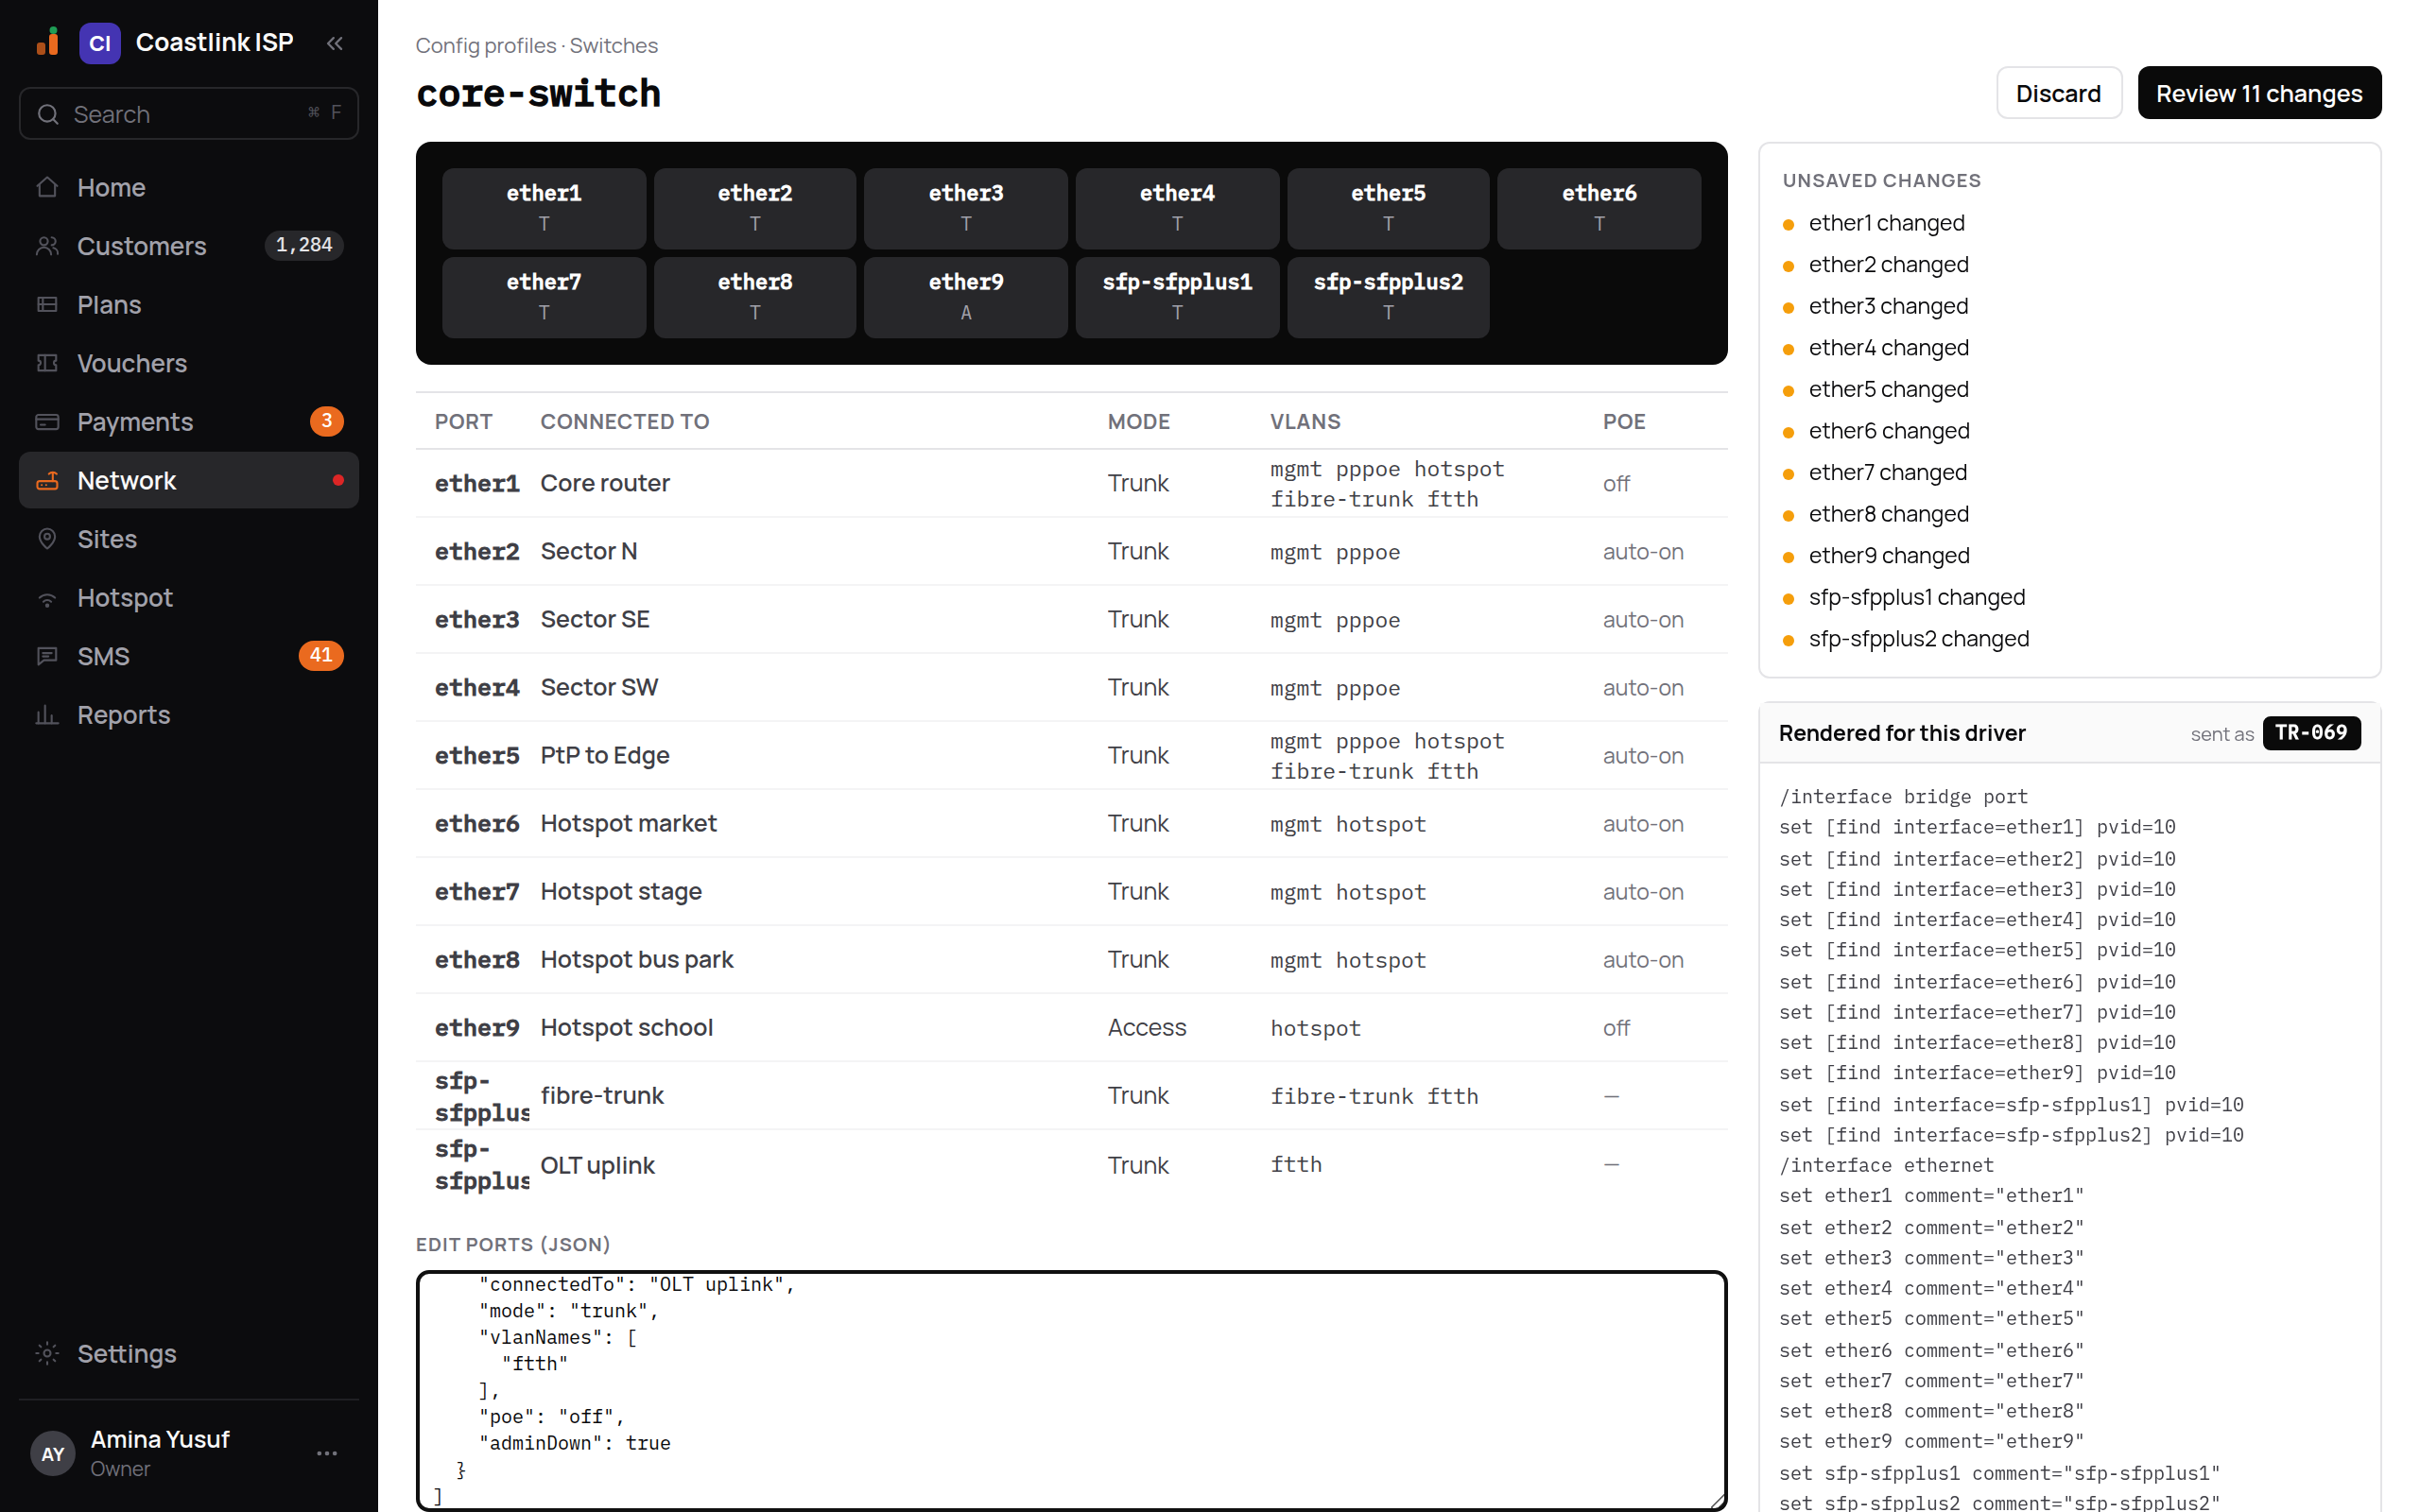
Click Review 1 change
The button counts your changes. Clicking it saves the profile and starts sending the change to the switch. You land on the progress page (see Follow a change to the end).
Discard throws your edits away instead.
What you can set on a port
| Field | What to put | Example |
|---|---|---|
name | The port name, exactly as the switch prints it. Do not change it. | ether9, sfp-sfpplus1 |
connectedTo | A plain label for what is plugged in. Shown in the table only. | Hotspot school |
mode | trunk for a link that carries several VLANs (to a router, another switch or a sector), access for a link that carries one. | access |
vlanNames | Trunk ports only: the VLAN names it carries, as a list. | ["mgmt", "pppoe"] |
vlanName | Access ports only: the one VLAN name. | "hotspot" |
poe | auto-on to power the device on the port (most radios and APs), off otherwise. | auto-on |
uplink | true on the port that leads back to your core. Changes to it need a second confirmation. | true |
adminDown | true to switch the port off without deleting its settings, for example a fibre port not yet cabled. | true |
Use VLAN names exactly as they appear in the VLAN plan. While what you have typed is not complete, a red line under the box says what is wrong, for example "Not valid JSON. Check for a missing comma, quote or bracket." or "ether9 · vlanName: Required". The table keeps showing the saved ports and Review stays disabled until the box is valid again, so a half-finished edit can never be sent. Discard puts the box back to the saved ports.
Changing an uplink port
If your change touches a port marked uplink, clicking Review opens This change touches a port marked uplink: "An uplink carries every other device's traffic on this switch." Type a Reason and the profile's name, then click Confirm. A mistake on an uplink port can cut the whole site off, so take the extra second.
Move a sector to a new frequency
Use this when a sector suffers interference, or when two of your own sectors are on the same frequency.
Open the radio plan
Click Radio plan on the Provisioning screen.
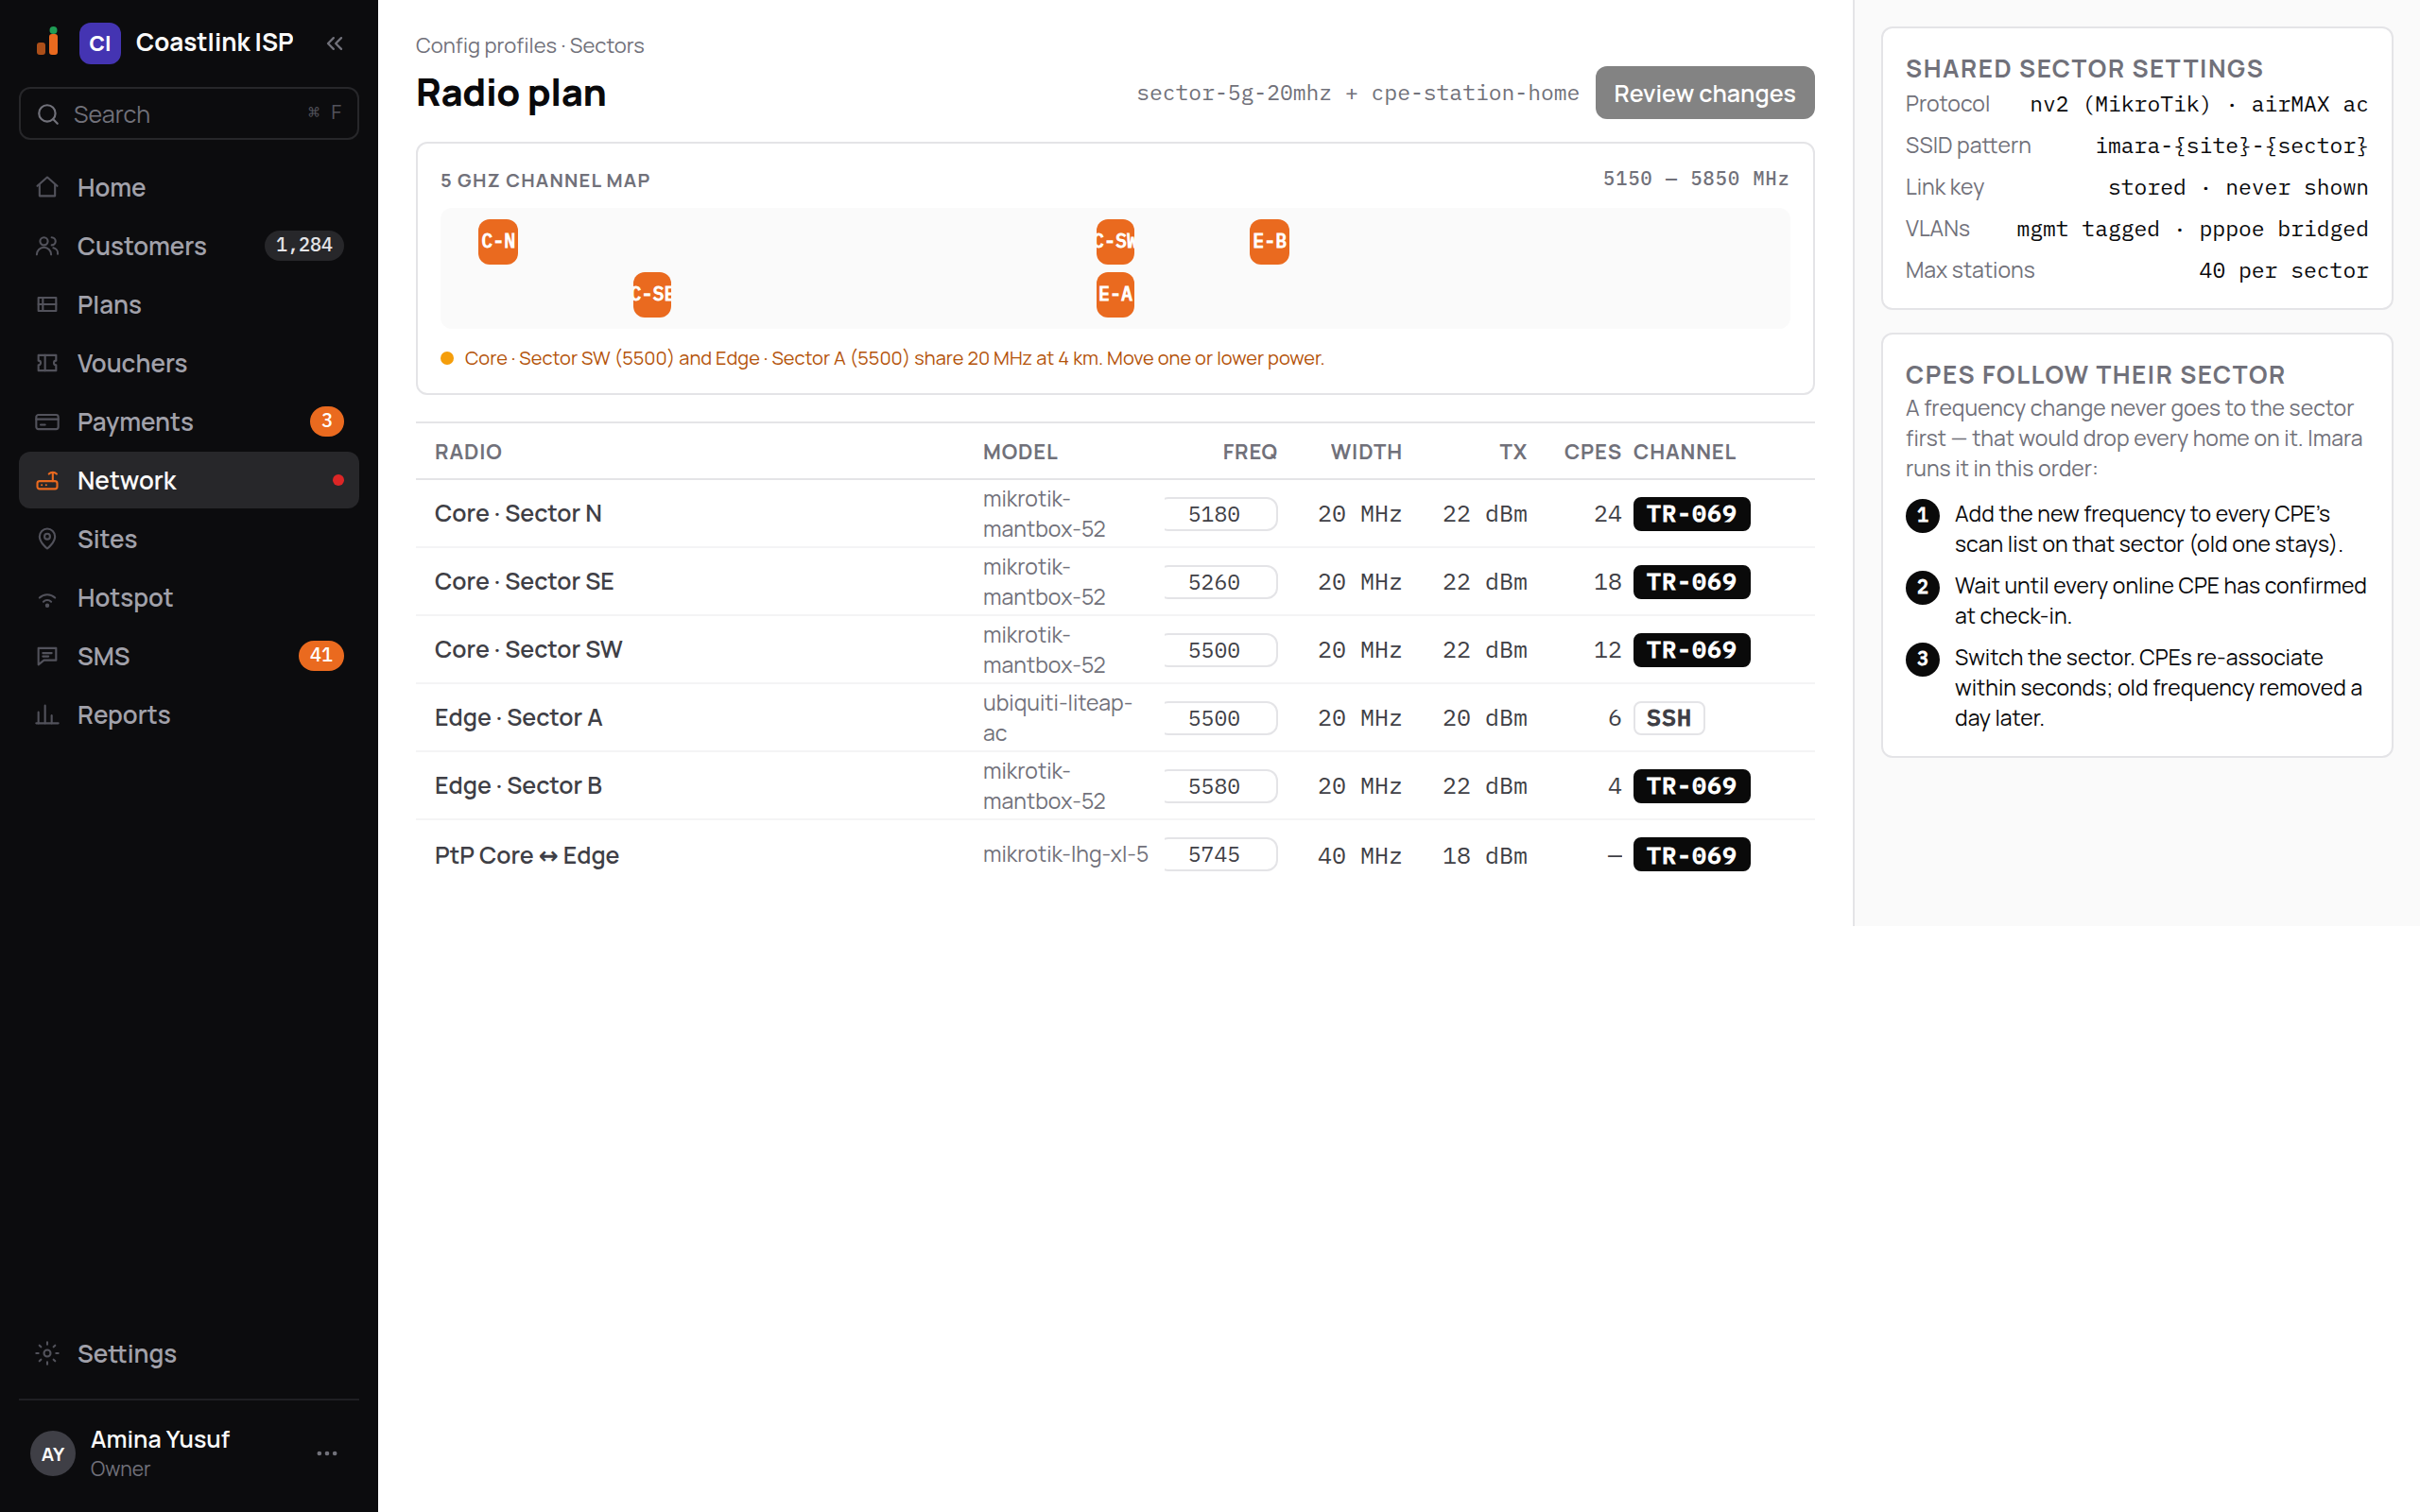
- The 5 GHz channel map shows every sector as an orange block at its frequency.
C-Nis Core · Sector N,E-Ais Edge · Sector A, and so on. Hover a block for its full name. - An amber line under the map warns about clashes, for example "Core · Sector SW (5500) and Edge · Sector A (5500) share 20 MHz at 4 km. Move one or lower power."
- The table lists each radio with its Model, Freq (MHz), Width, TX power, the number of CPEs (customer radios) that follow it, and its Channel.
- Shared sector settings on the right are the settings every sector and CPE share. The link key is stored and never shown.
Type the new frequency
Click the radio's Freq box and type the new frequency in MHz. Pick one where the channel map has nothing close by. Here, Core · Sector SE moves from 5260 to 5300.
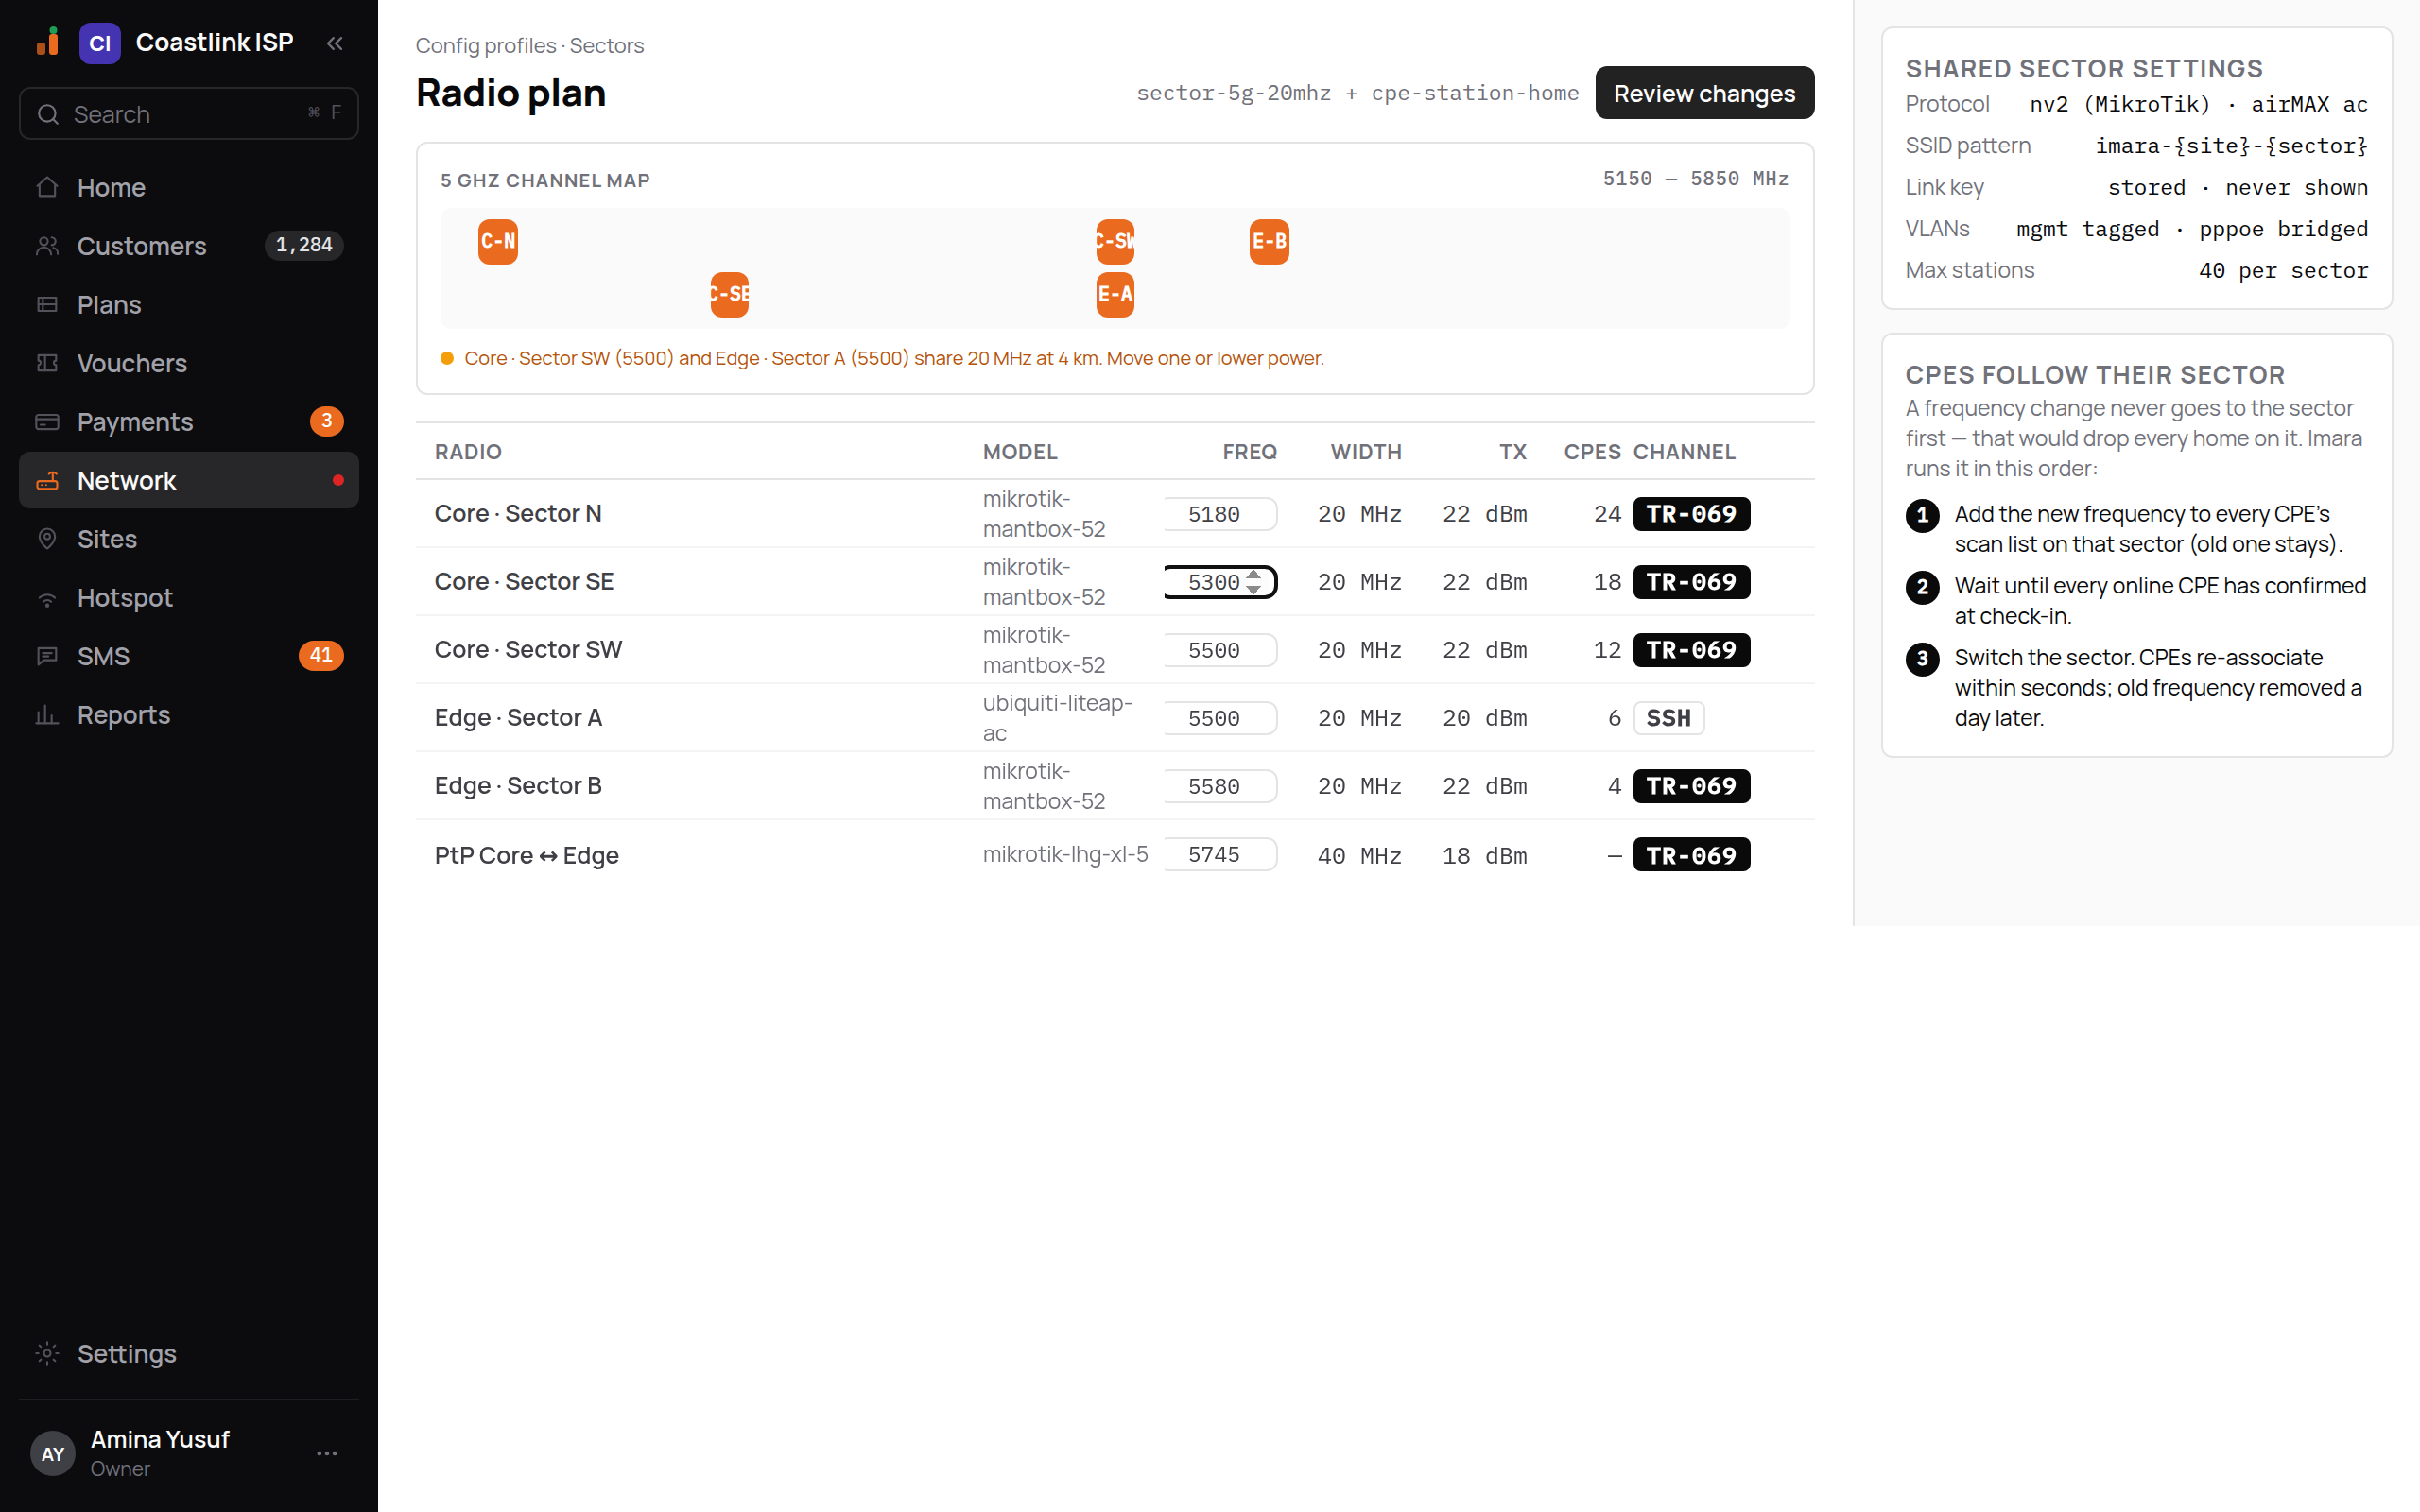
Click Review changes
The black Review changes button (it lights up once you have changed something) starts the move and opens its progress page.
Why it happens in stages
If the sector changed frequency first, every home on it would lose signal until their radios found it again. So ImaraISP moves the customers' radios before the sector, as the CPEs follow their sector card on the radio plan explains:
- Stage 1: every CPE on that sector is told to listen on the new frequency as well as the old one. Nobody notices; the sector has not moved.
- Stage 2: once every online CPE has confirmed the new list, the sector switches. The CPEs re-connect within seconds.
- Stage 3: a day later, the old frequency is removed from the CPEs' lists.
Billing and access are untouched throughout. Customers on the sector see at most a few seconds of reconnection during stage 2.
Follow a change to the end
Every change, whether a switch port or a frequency, opens a progress page like this one.
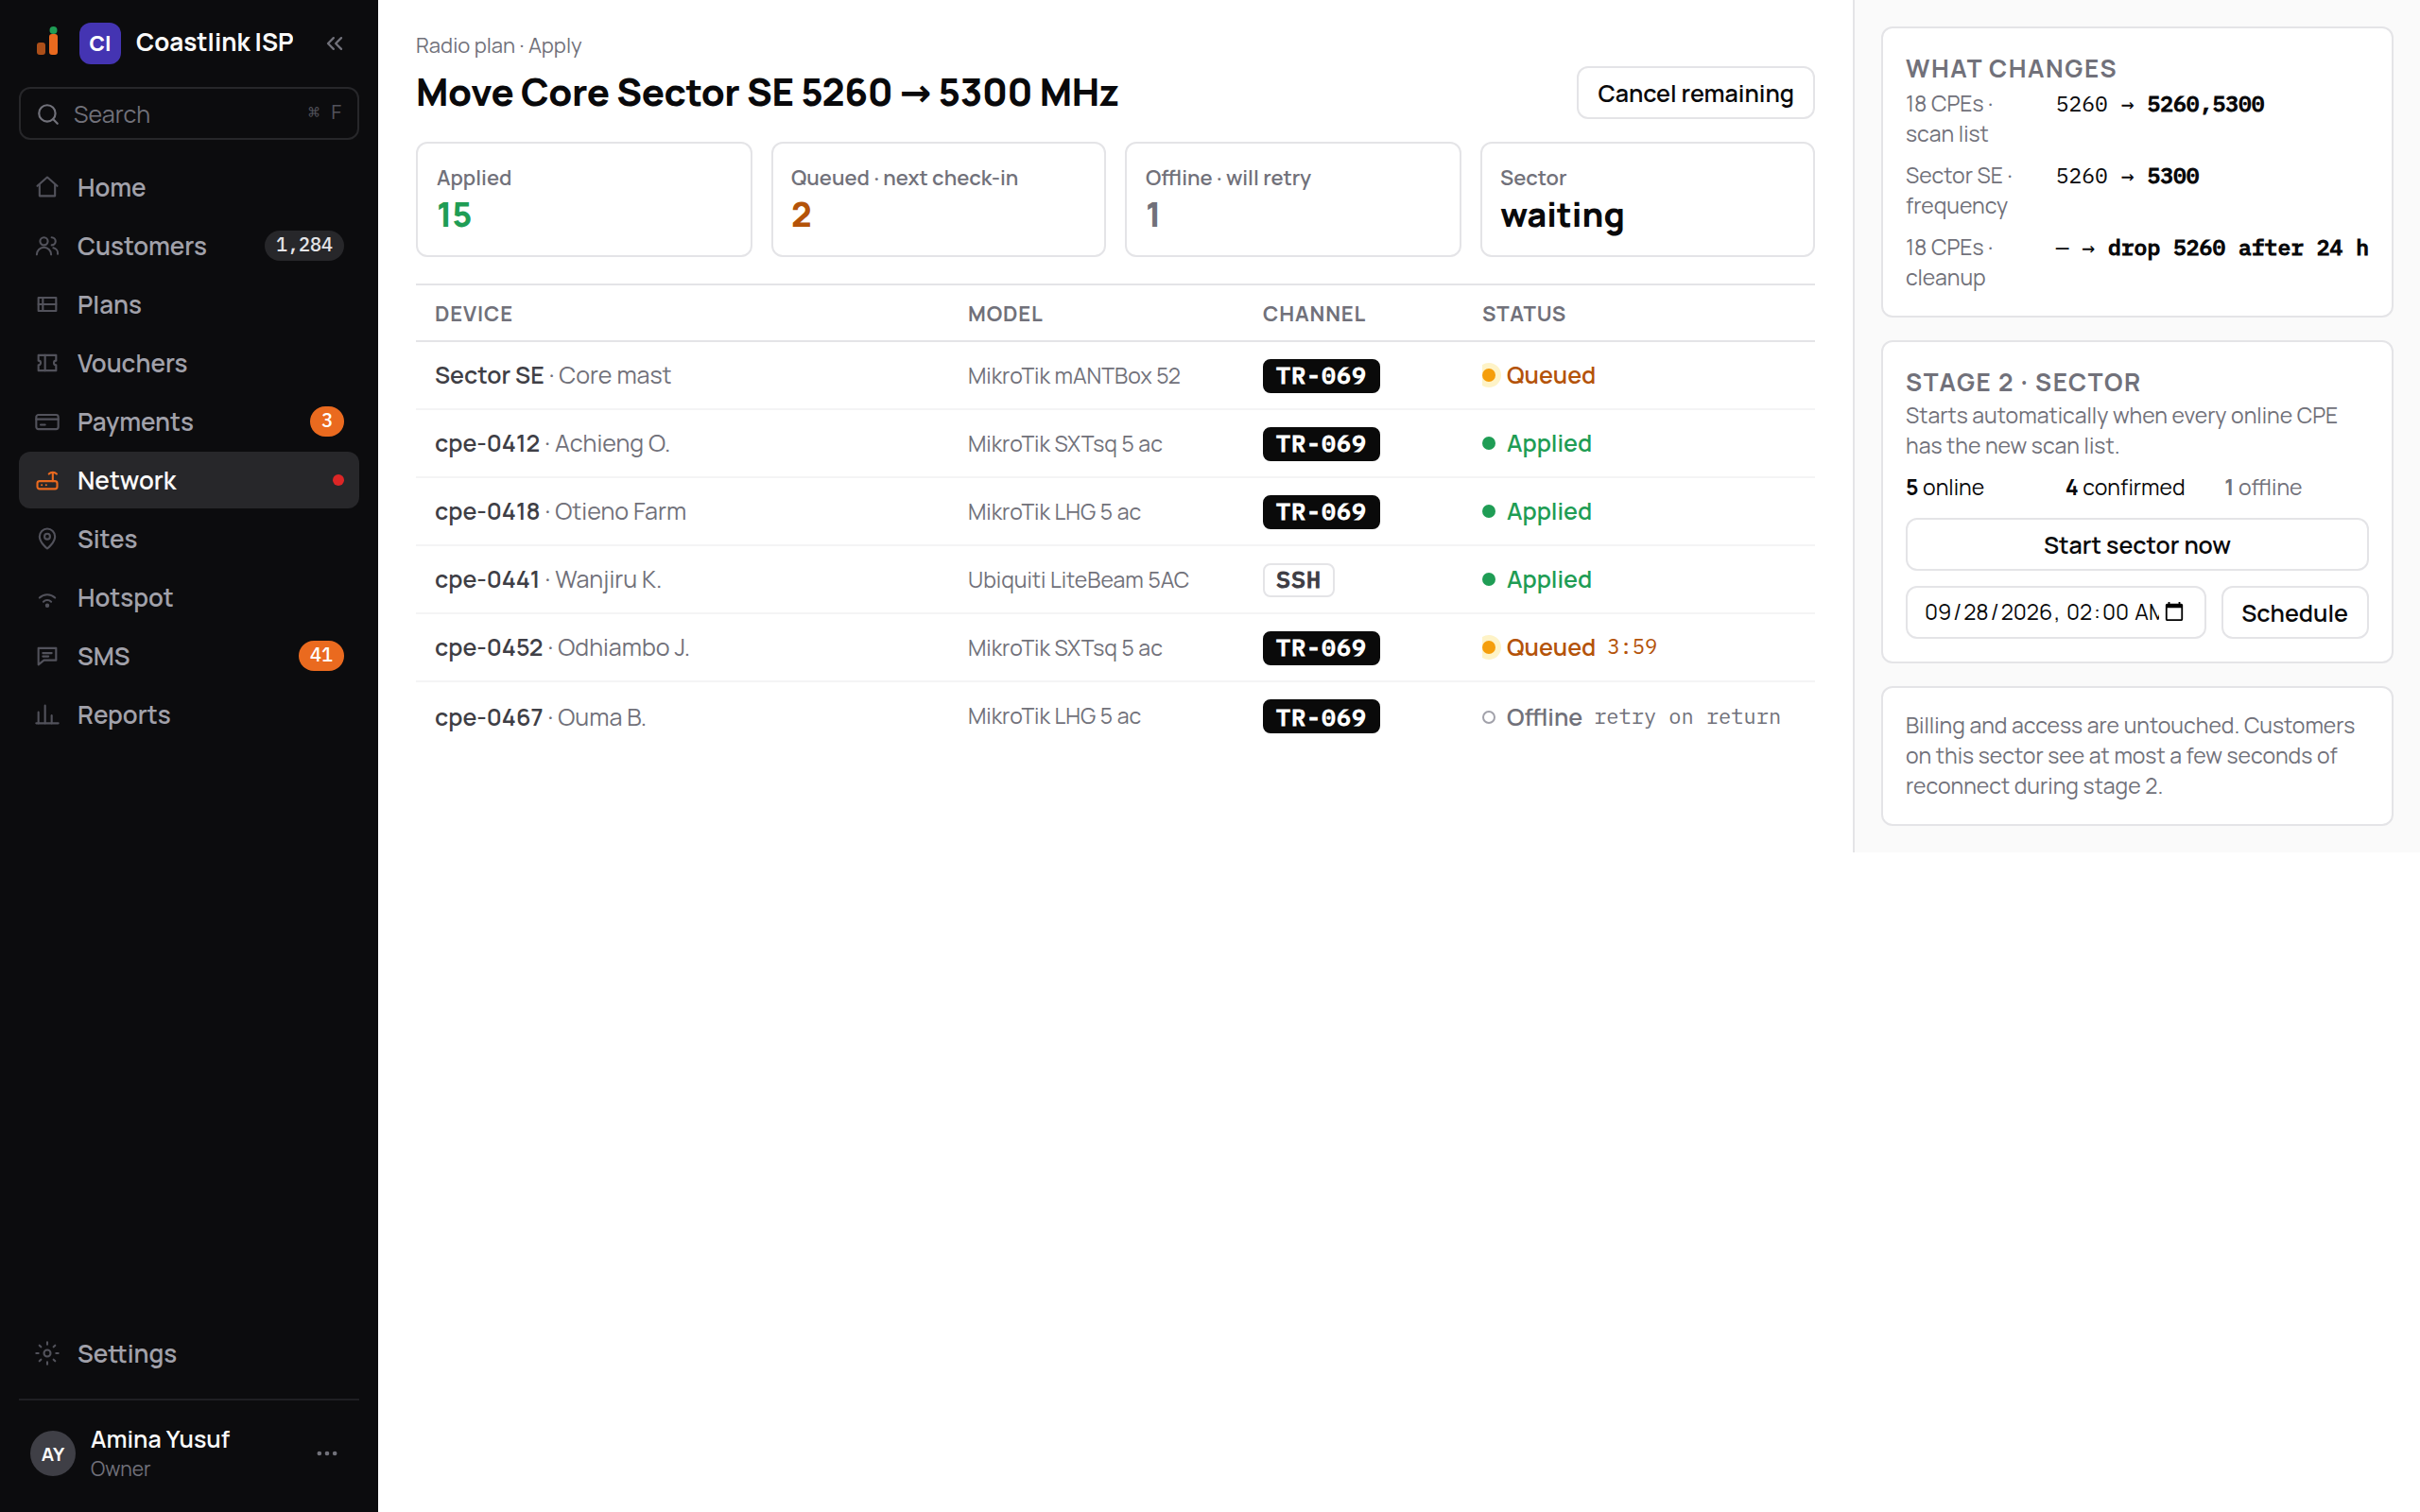
The four counters at the top are:
| Counter | Means |
|---|---|
| Applied | Devices that have the change. |
| Queued · next check-in | Devices waiting to call in. The change reaches them then. |
| Offline · will retry | Devices that are off right now. They get the change automatically when they come back. |
| Sector | For a frequency move: waiting until stage 2 starts, then its progress. |
Each device's row shows its Status:
- Applied (green): done.
- Queued, with a countdown such as
3:59: waiting for that device's next check-in. - Offline "retry on return": the device is off. Nothing for you to do unless it stays off.
- Rolled back: the device lost contact after the change and restored its previous settings by itself. Check the change, then try again.
- Failed: the device did not accept the change. Check what you changed and try again. If one device keeps failing while others apply, check it is the make and model the profile is written for.
What changes on the right lists every difference, for example "Sector SE · frequency 5260 → 5300" and "18 CPEs · cleanup, drop 5260 after 24 h".
Cancel remaining stops the change reaching devices that have not received it yet. Devices already marked Applied keep it.
Starting stage 2 yourself
The Stage 2 · Sector card shows how many CPEs are online, how many have confirmed and how many are offline. Stage 2 starts on its own once every online CPE has confirmed. You can also:
- Schedule it for a quiet hour. The time box defaults to the next 02:00. Pick a time and click Schedule.
- Start sector now, if you cannot wait. This asks for confirmation:
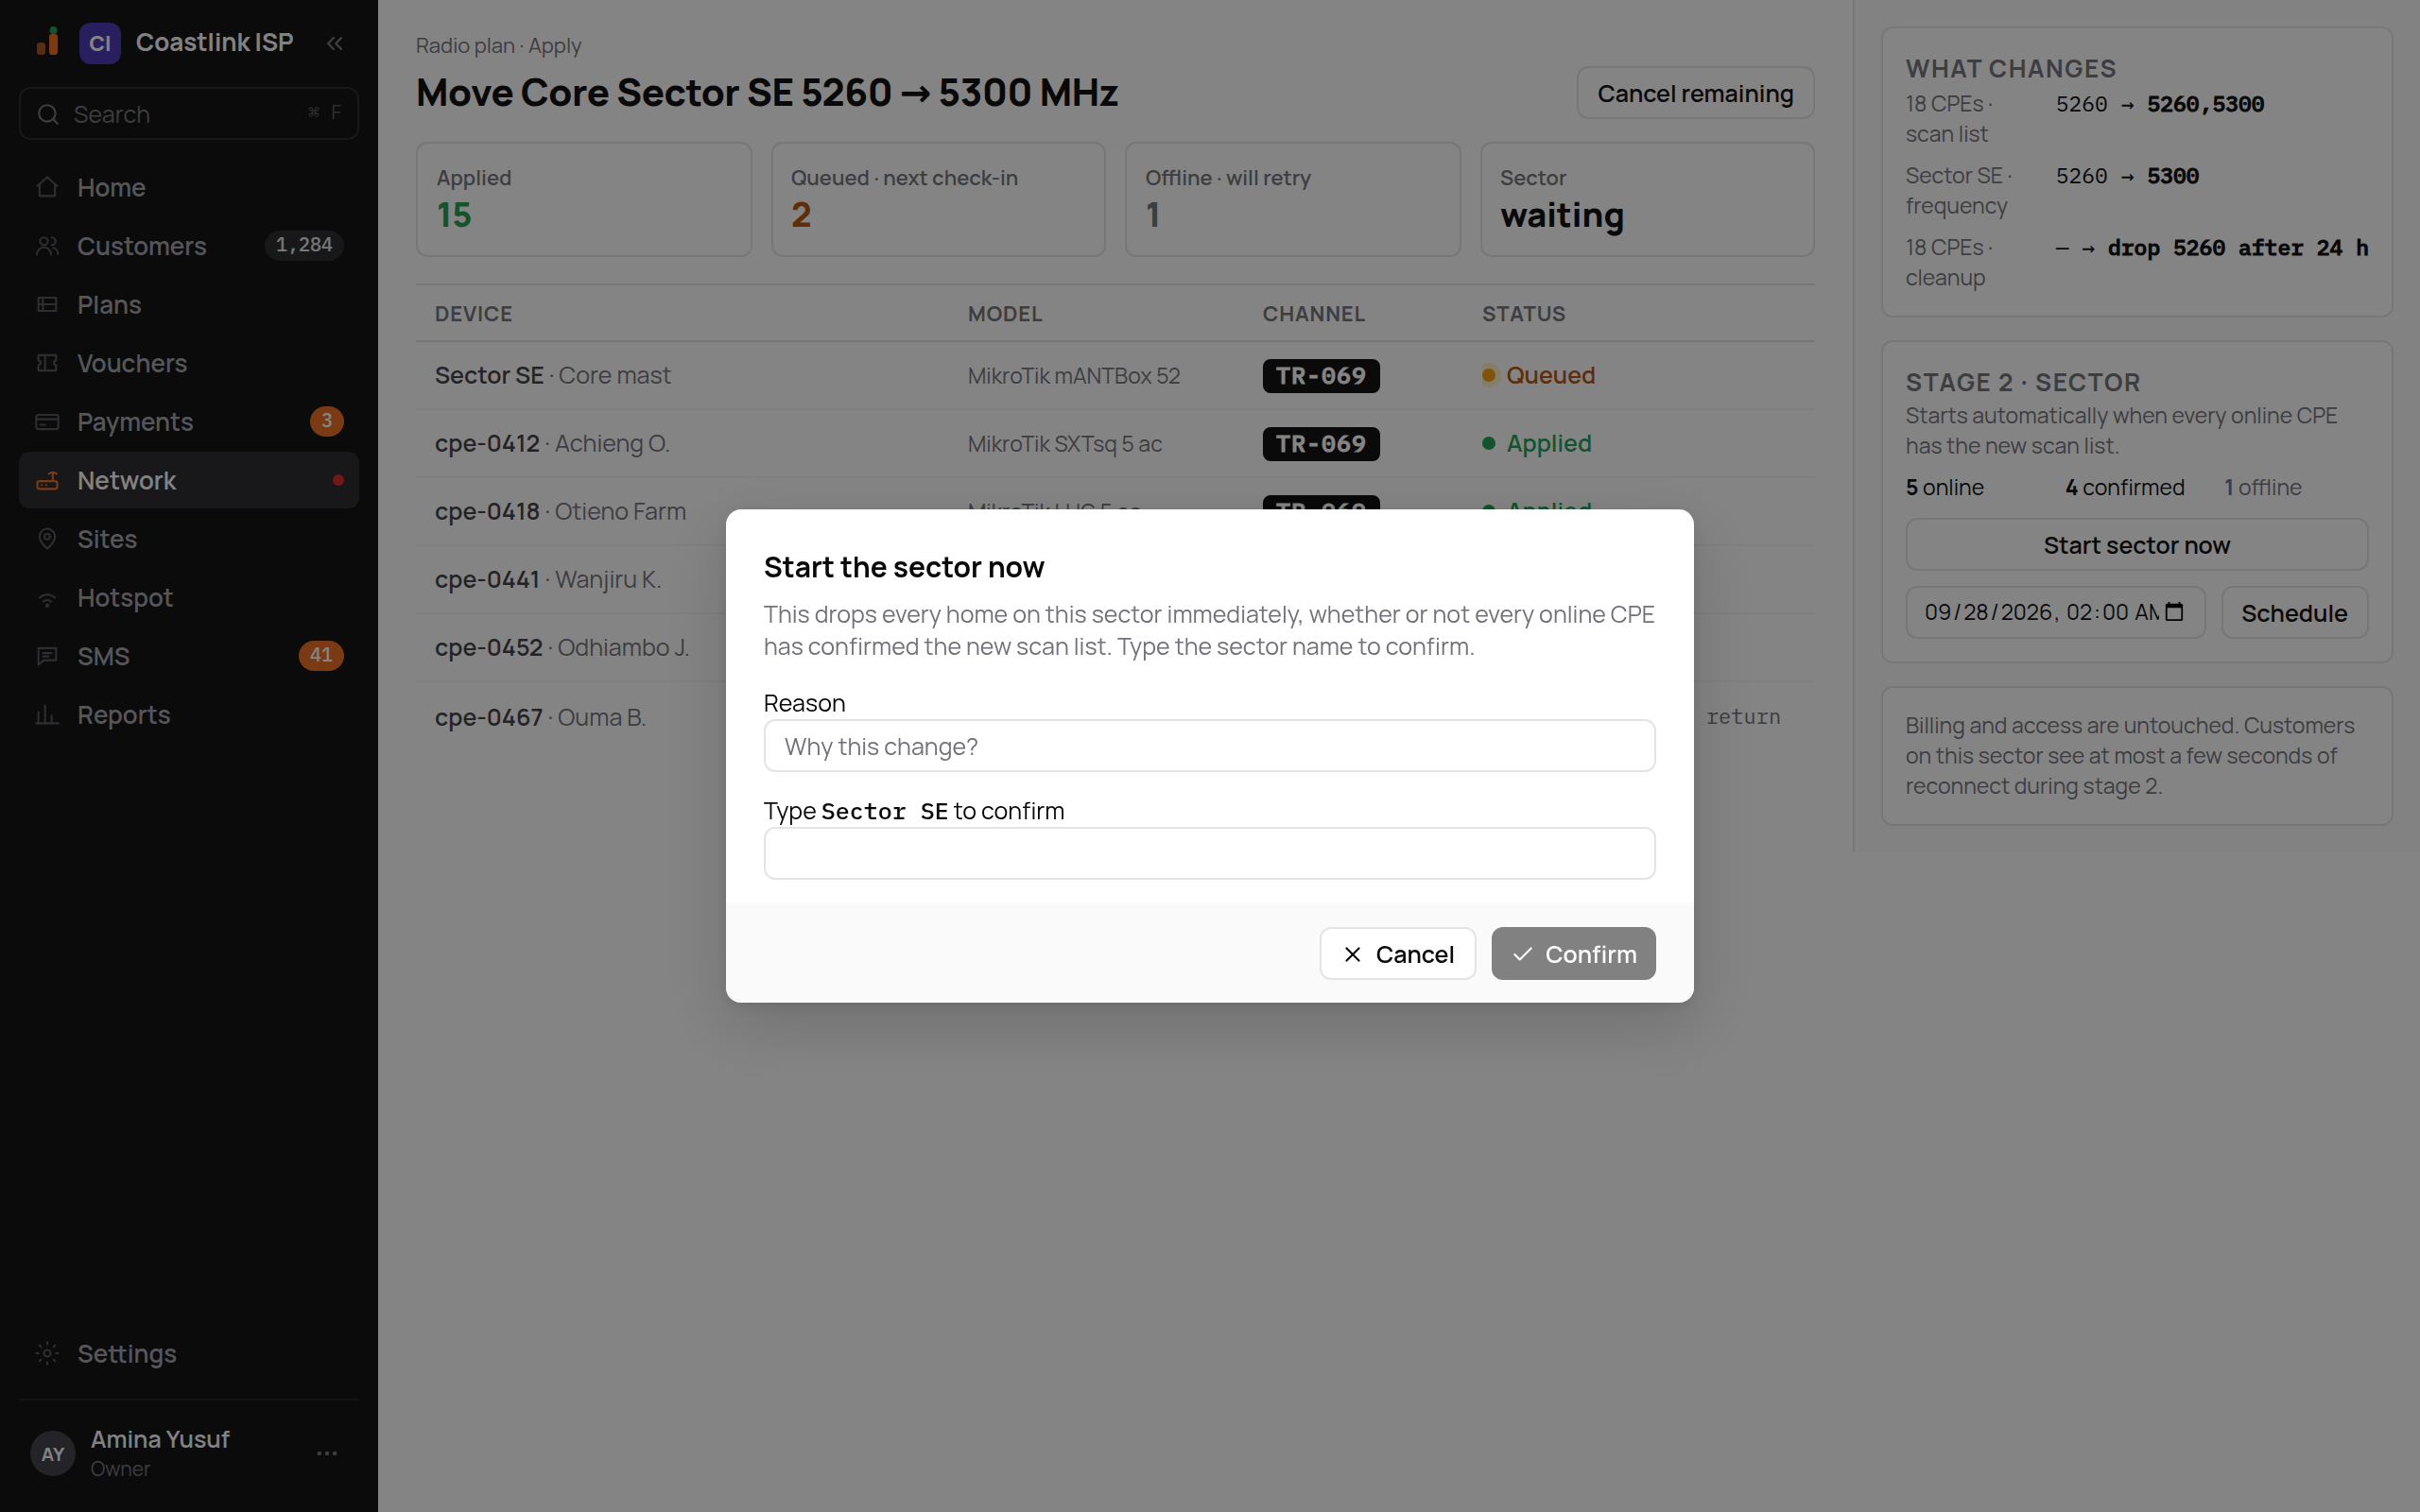
"This drops every home on this sector immediately, whether or not every online CPE has confirmed the new scan list." Type a Reason and the sector's name exactly as shown (here Sector SE), then click Confirm. A CPE that has not confirmed yet will lose its connection until it finds the new frequency. Scheduling a time less than five minutes away asks for the same confirmation.
Create a new profile
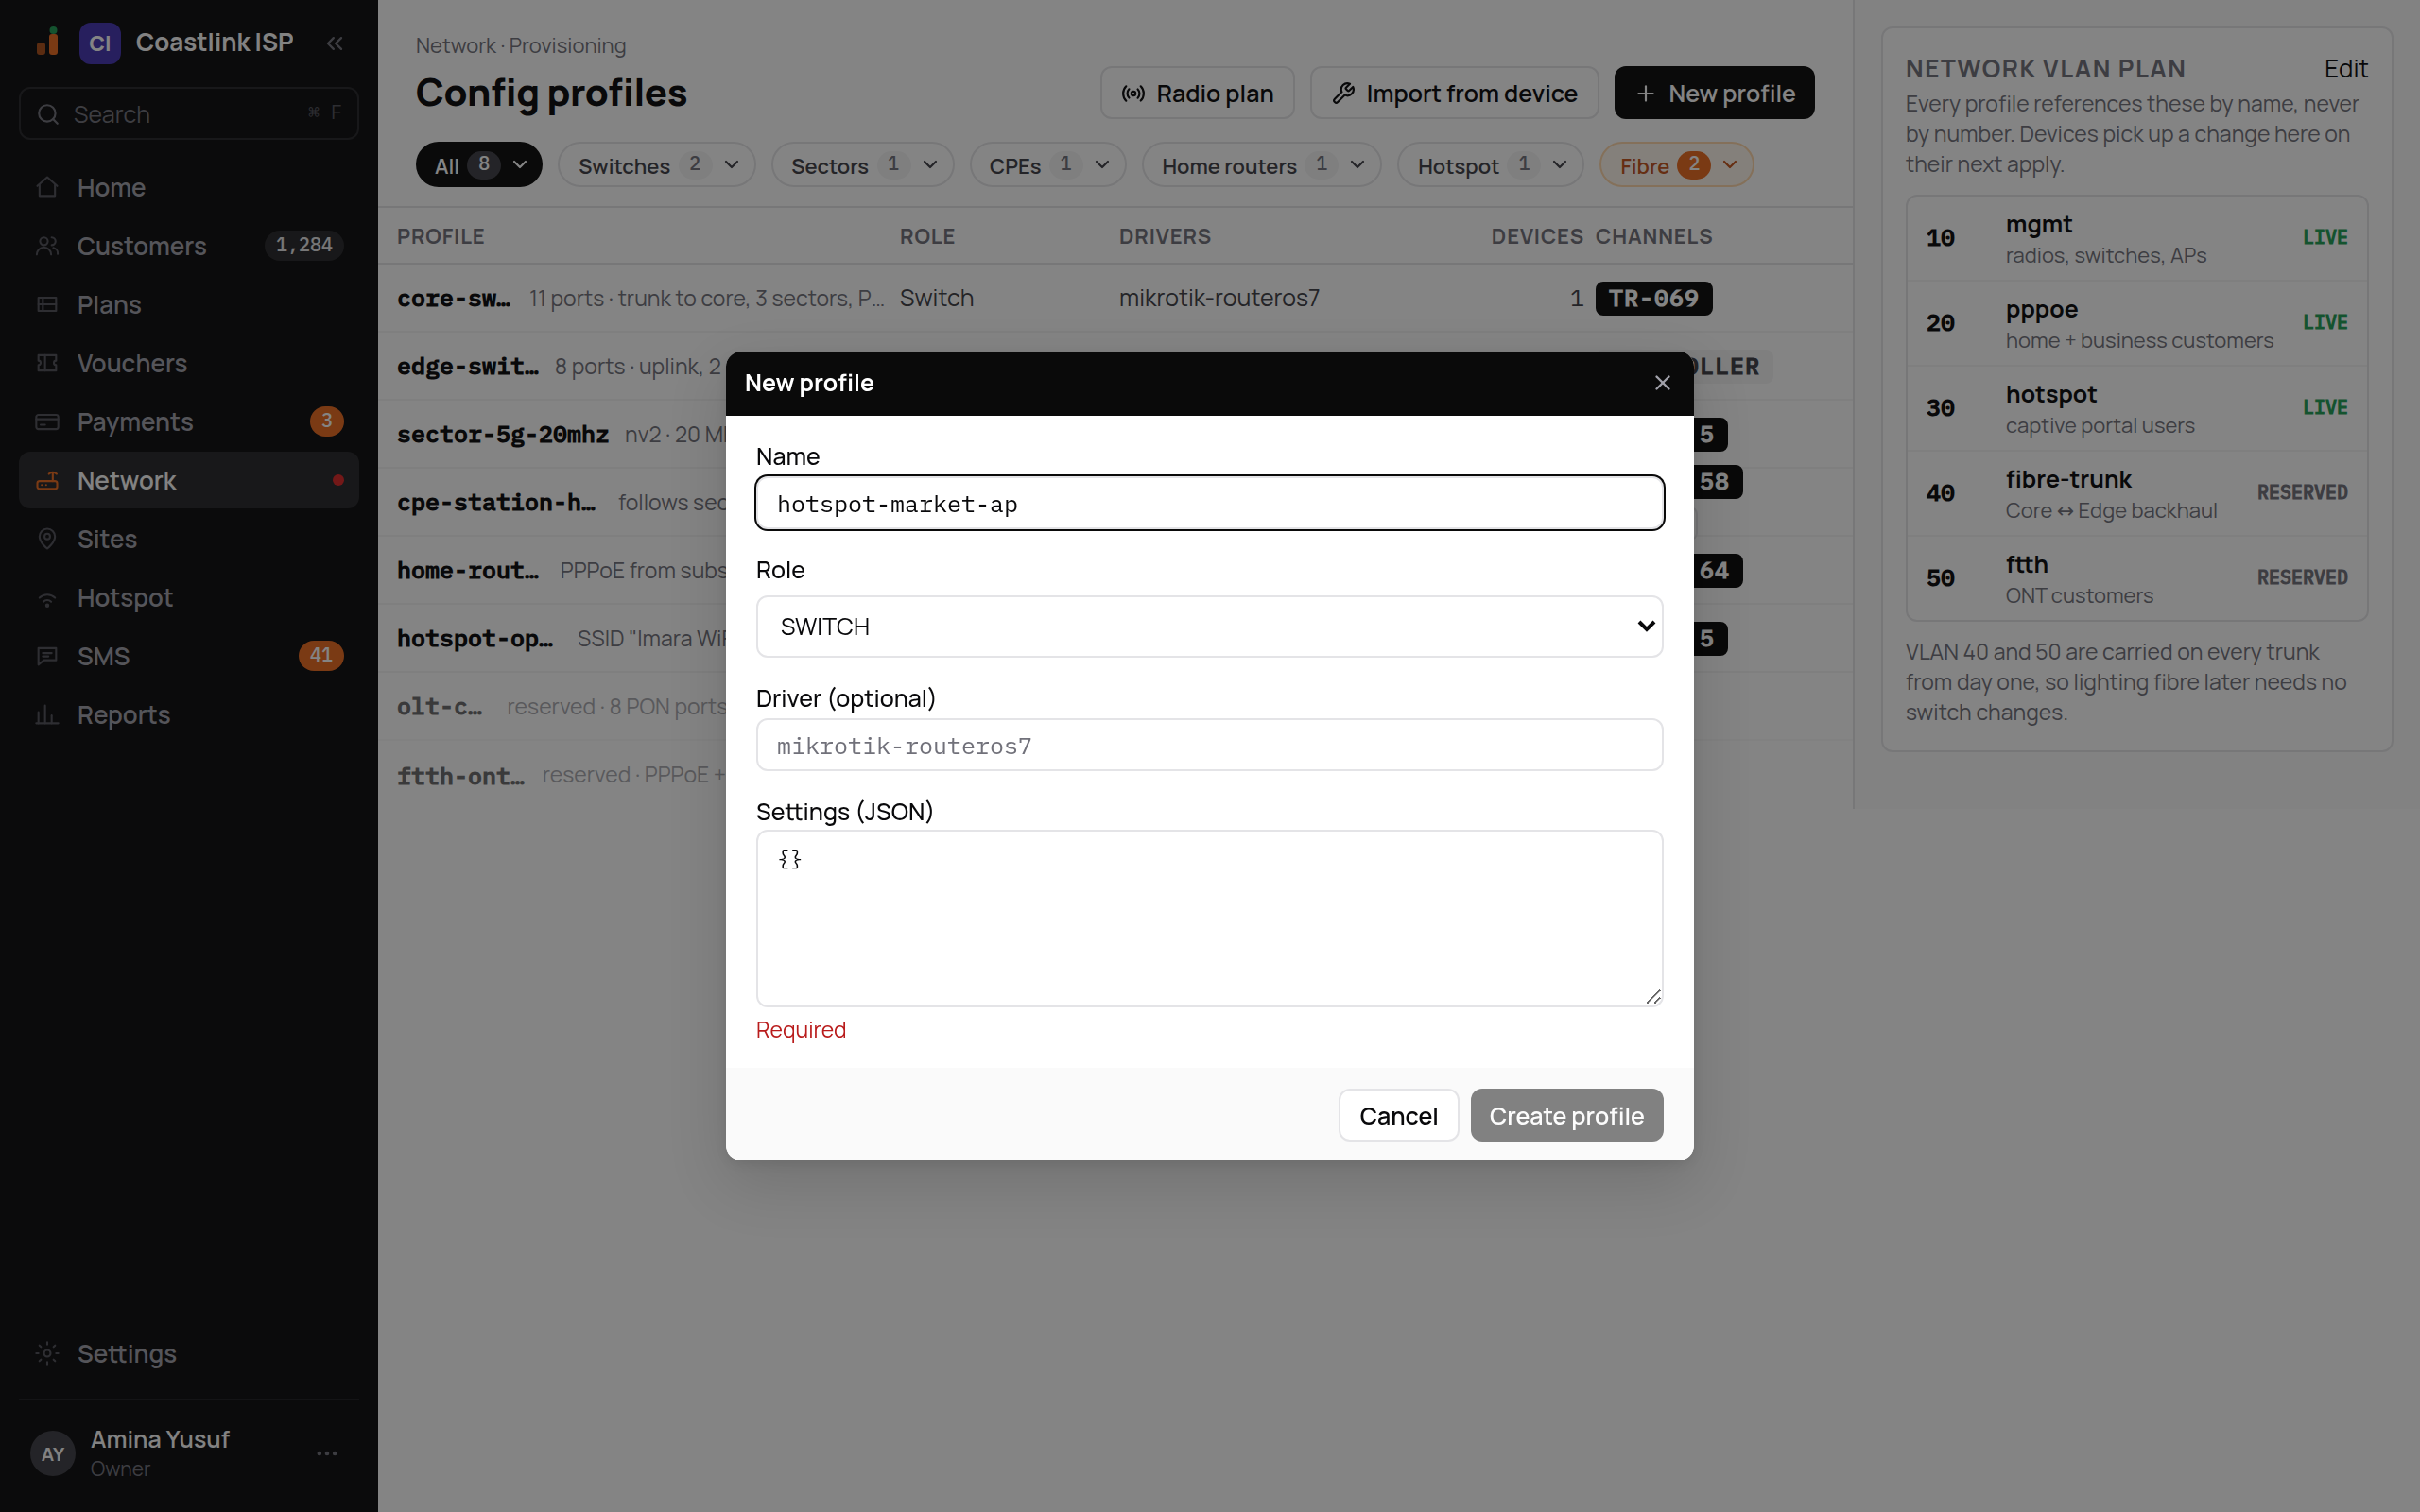
Fill it in
- Name: short and descriptive, lower case with dashes, for example
hotspot-market-ap. - Role: what kind of device it is for (SWITCH, SECTOR_AP, CPE_RADIO, HOME_ROUTER, HOTSPOT_AP, OLT, ONT, ROUTER).
- Driver (optional): the device family, for example
mikrotik-routeros7. - Settings (JSON): the starting settings. The field says Required in red until the settings suit the role you picked.
Click Create profile
The button is enabled once the settings are valid. The new profile appears in the list with 0 devices.
Starting settings that are accepted for each role:
| Role | Start with | Then |
|---|---|---|
| SWITCH | { "ports": [] } | Open the profile and add the ports in the Edit ports box. |
| SECTOR_AP | { "frequencyMhz": 5180, "widthMhz": 20, "txPowerDbm": 22, "ssidPattern": "imara-{site}-{sector}", "protocol": "nv2", "maxStations": 40 } | Use your own frequency. Width is 20, 40 or 80. |
| HOME_ROUTER, ONT | { "wifi": { "band": "dual", "security": "wpa2-psk" }, "pppoe": { "fromSubscriber": true } } | Band is 2.4ghz, 5ghz or dual. |
| OLT | { "onts": [] } | |
| CPE_RADIO, HOTSPOT_AP, ROUTER | {} |
Import from device
If you already configured a device by hand, Import from device can read its settings back into a new profile, so you do not have to type them. Choose the Device kind (Router, or CPE / AP / Switch), paste the Device id and click Import. Not every make supports this. When it does not, the dialog says "This driver can't be imported from yet — it has no read-back support." In that case, create the profile with New profile.
Safety net
- Switches roll back by themselves. Before a change, ImaraISP sends the switch a rollback instruction. If the switch does not check in within 5 minutes of the change, it restores its previous settings. A typo that cuts a switch off fixes itself.
- Dangerous actions ask you to type a name. Changing an uplink port asks for the profile name. Starting a sector early asks for the sector name. Both ask for a reason, and both are recorded.
- Nothing is instant. Changes reach each device at its next check-in, so a rollout takes minutes, not seconds. Watch the progress page rather than refreshing the device.
- Billing never changes. Provisioning changes device settings only. Customers' plans, balances and expiry dates are not touched.
Troubleshooting
| You see | Likely cause | Do this |
|---|---|---|
| No New profile button, no frequency boxes | Your role can view but not change | Ask an Owner. See Permissions. |
| Review 0 changes is greyed out | Nothing has changed yet | Edit a port in the Edit ports box first. |
| A red line under the Edit ports box | A comma, bracket or quote is missing, or a value is not one of the choices | The line names the port and field. Compare with What you can set on a port, or click Discard to start again. |
| A device stays Queued past its countdown | It missed its check-in | Wait one more cycle. If it still does not apply, check the device is powered and online. |
| A device shows Offline | It is switched off or has no link | It gets the change automatically when it is back. |
| A switch shows Rolled back | The change cut the switch off, so it undid itself | Look at what you changed on the uplink or management VLAN, fix it, and review again. |
| Stage 2 never starts | An online CPE has not confirmed the new frequency | Look for rows still Queued. Schedule stage 2 for the night, or start it now if you accept that those homes reconnect late. |
| The amber clash warning stays after the move | Another sector still shares the frequency | Move one of the two, or lower its power. |
| Import says the driver has no read-back support | That make cannot be read back | Create the profile with New profile instead. |